Flowable
一、什么是工作流
工作流,是把业务之间的各个步骤以及规则进行抽象和概括性的描述。使用特定的语言为业务流程建模,让其运行在计算机上,并让计算机进行计算和推动。
工作流是复杂版本的状态机。
| 简单状态 |
|---|
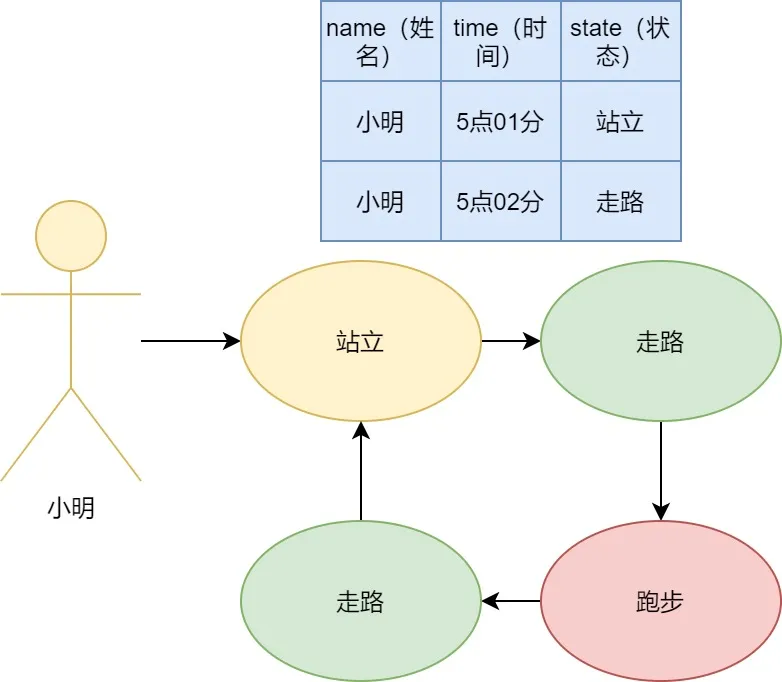 |
图一为工作流退化为基础状态机的例子,小明的状态非常简单,站立->走路->跑步->走路->站立,无限循环,如果让我们实现小明的状态切换,那么我们只需要用一个字段来记录小明当前的状态就好了。
而对于复杂的状态或者状态维度增加且状态流转的条件极为复杂,可能单纯用字段记录状态的实现方式就会不那么理想。
| 复杂状态 |
|---|
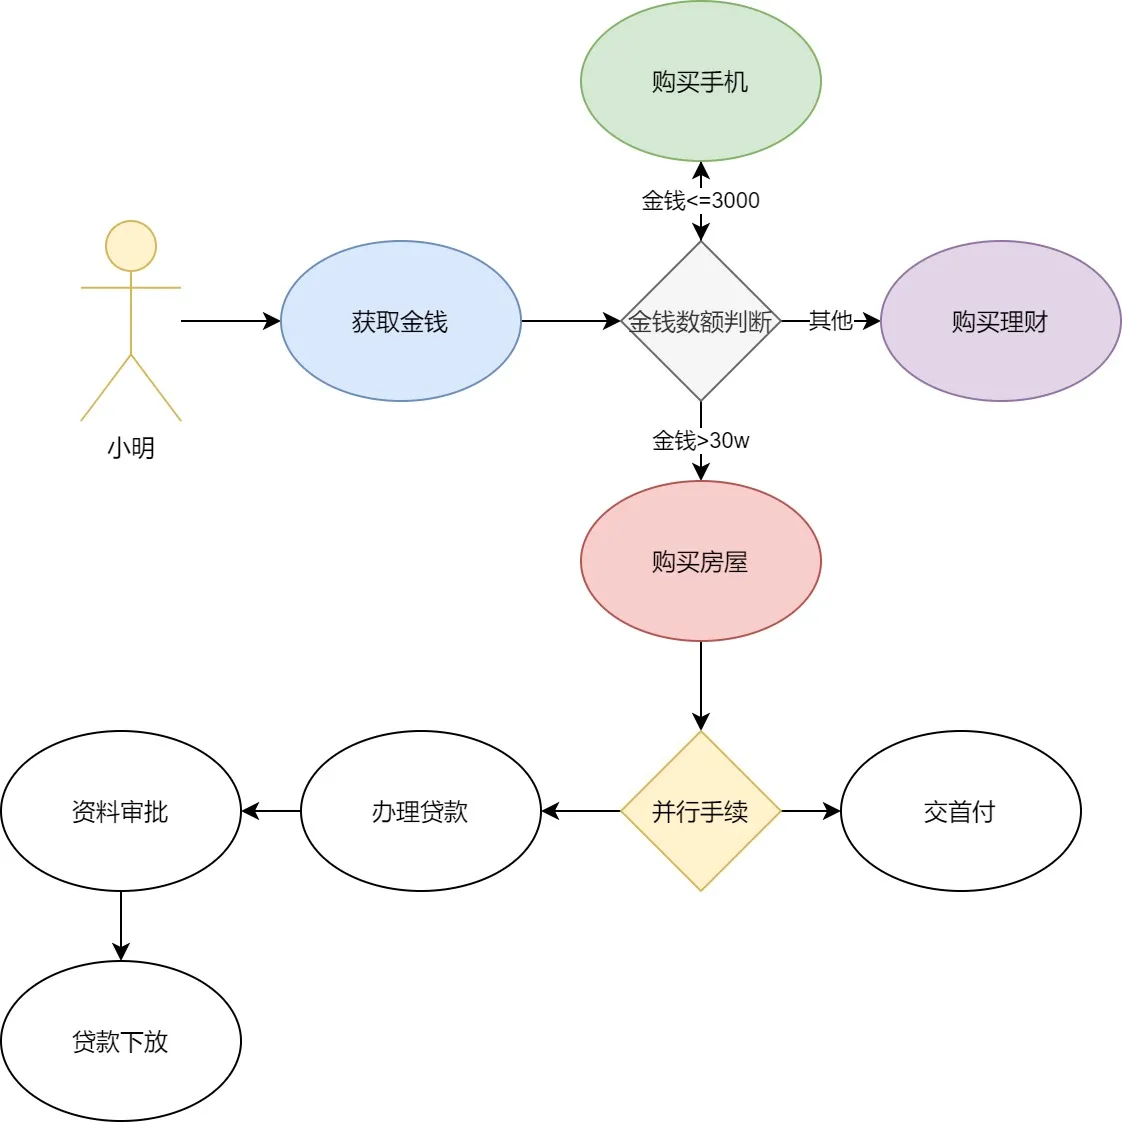 |
图二所示,现在交给小明的选择就多了起来,当小明获得金钱的时候,他会根据金钱数额的大小来判断接下来该如何行动,如果数额小于等于3000,那么他决定买一个新手机就够了,如果数额小于等于30万,那么小明就决定去学习一下理财,好好利用这笔钱,但如果小明获得的金钱数量超过了30万,他就决定购置一套房屋,但购置房屋的流程是复杂的,小明决定同时完成交首付和贷款的手续。
其实这个流程还不算特别复杂,但到目前为止,单纯用一个字段来表明状态已经无法满足要求了。
工作流解决的痛点在于,解除业务宏观流程和微观逻辑的耦合,让熟悉宏观业务流程的人去制定整套流转逻辑,而让专业的人只需要关心他们应当关心的流程节点,就好比大家要一起修建一座超级体育场,路人甲只需要关心他身边的这一堆砖是怎么堆砌而非整座建筑。
| 那么工作流有什么不能解决的问题呢? |
|---|
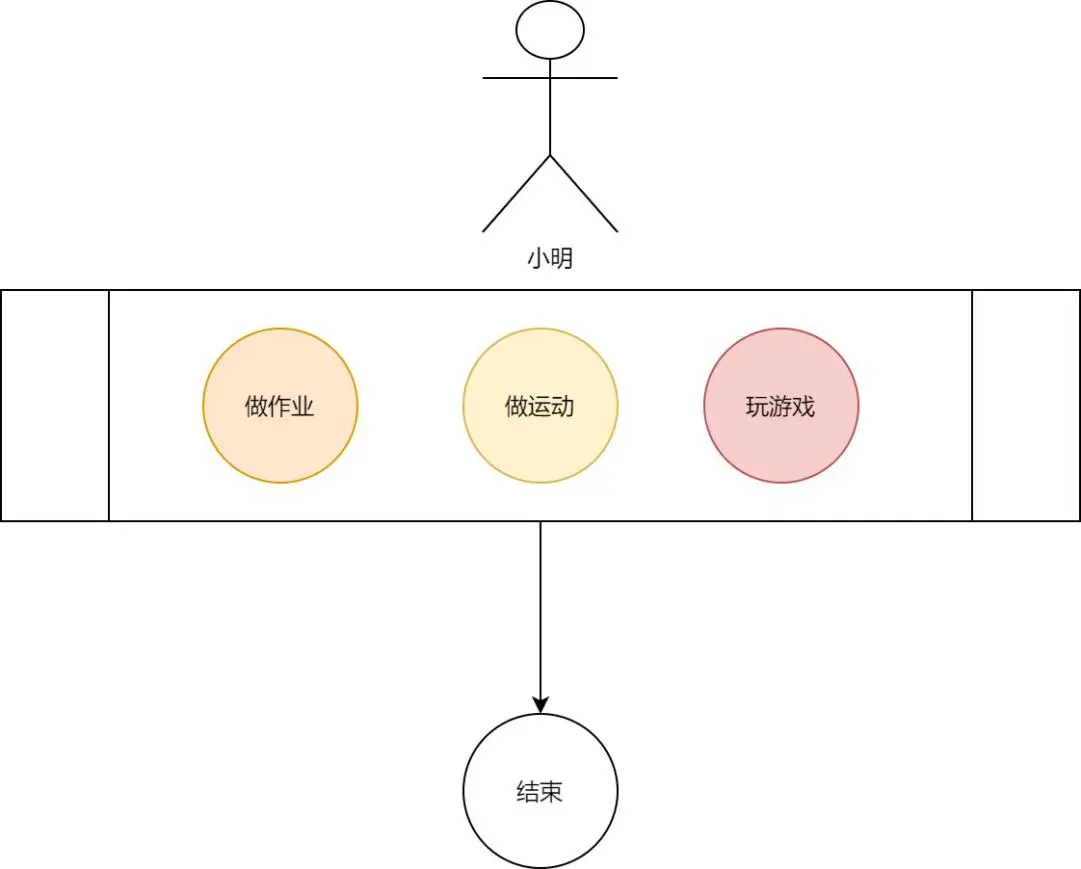 |
工作流是一个固定好的框架,大家就按照这个框架来执行流程就行了,但某些情况他本身没有流转顺序的要求,比如:小明每天需要做作业,做运动以及玩游戏,它们之间没有关联性无法建立流程,但可以根据每一项完成的状态决定今天的任务是否完结,这种情况我们需要使用CMMN来建模,它就是专门针对这种情况而设计的,但今天我们不讲这个,而是讲讲BPMN协议。
二、BPMN2.0协议
对于业务建模,我们需要一种通用的语言来描绘,这样在沟通上和实现上会降低难度,就像中文、英文一样,BPMN2.0便是一种国际通用的建模语言,他能让自然人轻松阅读,更能被计算机所解析。
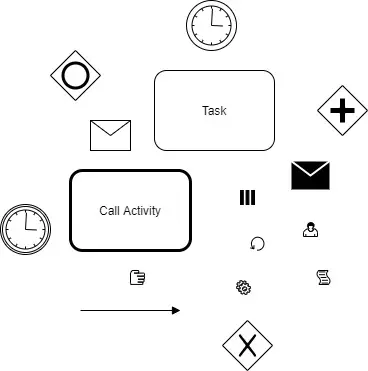
协议中元素的主要分类为,事件-任务-连线-网关。
一个流程必须包含一个事件(如:开始事件)和至少一个结束(事件)。其中网关的作用是流程流转逻辑的控制。任务则分很多类型,他们各司其职,所有节点均由连线联系起来。
下面我就以每种类型的节点简单地概括一下其作用。
网关:
img 互斥网关(Exclusive Gateway),又称排他网关,他有且仅有一个有效出口,可以理解为if......else if...... else if......else,就和我们平时写代码的一样。
img 并行网关(Parallel Gateway),他的所有出口都会被执行,可以理解为开多线程同时执行多个任务。
img 包容性网关(Inclusive Gateway),只要满足条件的出口都会执行,可以理解为 if(......) do, if (......) do, if (......) do,所有的条件判断都是同级别的。


任务:
BPMN2.0协议的所有任务其实是从一个抽象任务派生而来的,抽象任务会有如下行为:
- 当流程流转到该任务时,应该做些什么?
- 当该任务获得信号(signal)的时候,它是否可以继续向下流转,而任务获得信号的这个动作我们称为Trigger。
利用如上的抽象行为,我们来解释一些比较常见且具有代表性的任务类型。
img 人工任务(User Task),它是使用得做多的一种任务类型,他自带有一些人工任务的变量,例如签收人(Assignee),签收人就代表该任务交由谁处理,我们也可以通过某个特定或一系列特定的签收人来查找待办任务。利用上面的行为解释便是,当到达User Task节点的时候,节点设置Assignee变量或等待设置Assignee变量,当任务被完成的时候,我们使用Trigger来要求流程引擎退出该任务,继续流转。
img **服务任务(Service Task),**该任务会在到达的时候执行一段自动的逻辑并自动流转。从“到达自动执行一段逻辑”这里我们就可以发现,服务任务的想象空间就可以非常大,我们可以执行一段计算,执行发送邮件,执行RPC调用,而使用最广泛的则为HTTP调用,因为HTTP是使用最广泛的协议之一,它可以解决大部分第三方调用问题,在我们的使用中,HTTP服务任务也被我们单独剥离出来作为一个特殊任务节点。
img 接受任务(Receive Task),该任务的名字让人费解,但它又是最简单的一种任务,当该任务到达的时候,它不做任何逻辑,而是被动地等待Trigger,它的适用场景往往是一些不明确的阻塞,比如:一个复杂的计算需要等待很多条件,这些条件是需要人为来判断是否可以执行,而不是直接执行,这个时候,工作人员如果判断可以继续了,那么就Trigger一下使其流转。
img 调用活动(Call Activity),调用活动可以理解为函数调用,它会引用另外一个流程使之作为子流程运行,调用活动跟函数调用的功能一样,使流程模块化,增加复用的可能性。

上面大概介绍了一下常用的节点,下面的图就展示了一个以BPMN2.0为基础的流程模型,尽量覆盖到所介绍的所有节点。

这里是一个生产汽车的流程,从“汽车设计”节点到“批准生产”节点是一个串行的任务,而审批的结果会遇到一个互斥网关,上面讲过,互斥网关只需要满足其中一个条件就会流转,而这里表达的意义就是审批是否通过。“载入图纸”是一个服务任务,它是自动执行的,之后会卡在“等待原材料”这个节点,因为这个节点是需要人为去判断(比如原材料涨价,原材料不足等因素),所以需要在一种自定义的条件下Trigger,而该图的条件应该为“原材料足够”,原材料足够之后,我们会开始并行生产汽车零件。
需要注意的是,并行网关在图中是成对出现的,他的作用是开始一系列并行任务和等待并行任务一起完成,拿一个Java中的东西举例子,就是**CountDownLatch,**fork-join模型也可以类比。

说到这里,网关的底层逻辑我作为拓展提一句,没听懂也无伤大雅。网关的本质其实是计数器和出口逻辑的混合,它跟其他节点没什么区别,只是他的推动逻辑需要使他的计数器为0,而计数器的总数为网关入口线段的数量,比如“组装”节点前面的并行网关,他的计数器就为4,而前面4个节点,每完成一个就会触发该网关计数器-1。
当计数器为0的时候,网关会触发选择后续流转的逻辑。
三、工作流关心什么

首先,从用户的角度来看,使用者其实只需要关心三件事
- 我如何把我的业务逻辑转化为流程图-即容易理解的绘图工具。
- 我如何使流程流转-即开箱即用的API。
- 我需要引擎告诉我,我现在该处理什么节点-即丰富且鲜明的事件机制。
图中是流程图的整个生命周期,从画图到部署,然后启动流程,流程经过人工或自动的方式流转,最后结束。

四、Flowable简介

1. Flowable是什么
Flowable是BPMN2.0协议的一种Java版本的实现,是一个使用Java编写的轻量级业务流程引擎。Flowable流程引擎可用于部署BPMN 2.0流程定义(用于定义流程的行业XML标准), 创建这些流程定义的流程实例,进行查询,访问运行中或历史的流程实例与相关数据,等等。
Flowable可以嵌入Java应用程序中运行,也可以作为服务器、集群运行,更可以提供云服务。
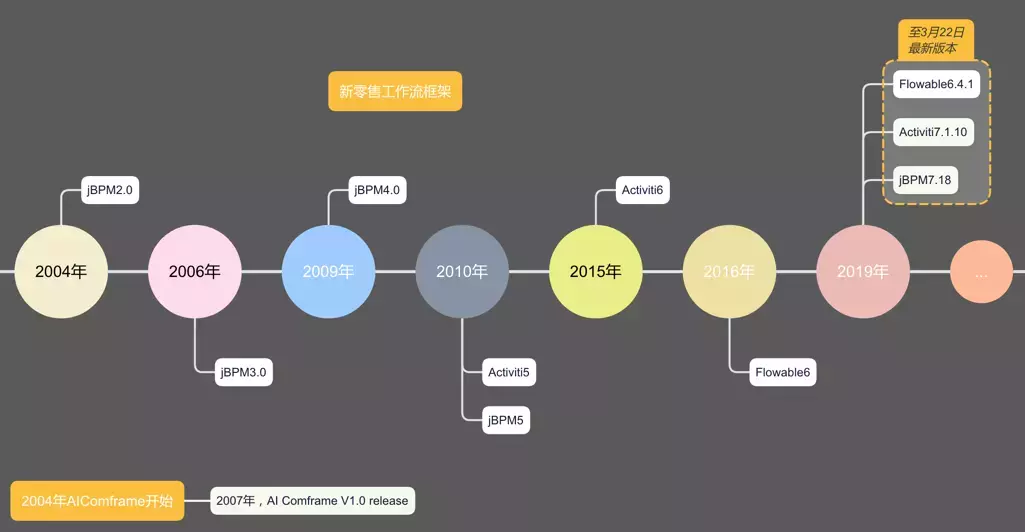
2. Flowable与Activiti
Flowable项目源自于Activiti,通过两个框架的发展史即知。在2016.7~2017.5期间Activiti团队内部已经产生了重大的分歧,于是原班核心人员(Activiti5以及6比较核心的leader)Tijs Rademakers和Joram Barrez等便去开发Flowable框架了,原来的Activiti6以及Activiti5代码则留给 Salaboy团队进行开发和维护。
Flowable是基于Activiti-6.0.0.Beta4分支开发的。目前Flowable已经修复了Activiti6很多的bug,可以实现零成本从Activiti迁移到Flowable。
五、第一个应用
1. Spring Boot 整合 Flowable
Spring Boot 提倡约定大于配置。要开始工作,只需在项目中添加flowable-spring-boot-starter依赖,另外Flowable还需要数据库来存储数据。我这里使用mysql + jpa,当然也可以使用H2数据库或者其他数据库。maven配置:
<dependency>
    <groupId>mysql</groupId>
    <artifactId>mysql-connector-java</artifactId>
</dependency>
<dependency>
    <groupId>org.springframework.boot</groupId>
    <artifactId>spring-boot-starter-data-jpa</artifactId>
</dependency>
<dependency>
    <groupId>org.flowable</groupId>
    <artifactId>flowable-spring-boot-starter</artifactId>
    <version>6.7.1</version>
</dependency>
接下来创建对应的数据库,配置数据源:
spring:
  datasource:
    url: jdbc:mysql://localhost:3306/flowable?serverTimezone=Asia/Shanghai&allowMultiQueries=true&useUnicode=true&characterEncoding=UTF-8
    username: root
    password: root
    driver-class-name: com.mysql.cj.jdbc.Driver
  jpa:
    properties:
      hibernate:
        hbm2ddl:
          auto: update
        dialect: org.hibernate.dialect.MySQL5InnoDBDialect
    open-in-view: true
以上步骤就是最简单的整合方法了。
运行项目,Flowable创建一系列的数据库表(对应表的用途说明请看文末附件),那就代表整合成功了。
2. 部署流程模型
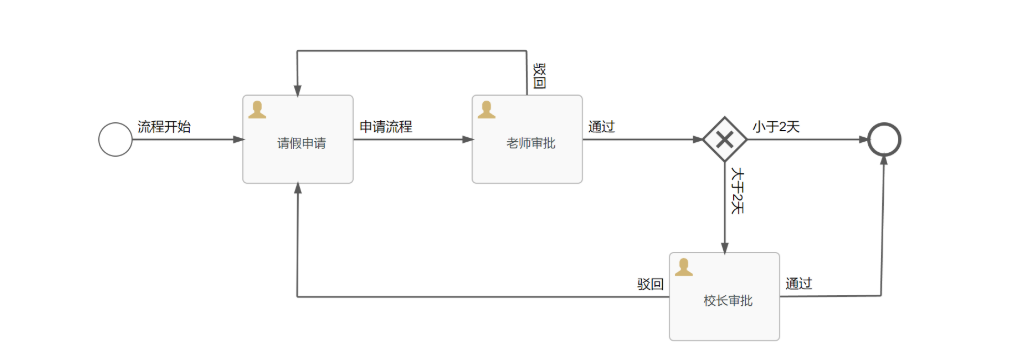
这里用学生请假流程做例子,首先由学生发起请假申请,然后由老师进行审核,老师审核结束后进行判断:
1.如果请假天数大于2天,流转到校长处审核,然后流程结束。
2.如果请假天数不大于2天,流程结束。
部署流程需要一个.bpmn20.xml文件,可以手动编辑,也可以借助一些工具创建Flowable ModelerFlowable 提供的Web模型编辑工具、IDEA IDE 插件等等
<?xml version="1.0" encoding="UTF-8"?>
<definitions xmlns="http://www.omg.org/spec/BPMN/20100524/MODEL" xmlns:xsi="http://www.w3.org/2001/XMLSchema-instance" xmlns:xsd="http://www.w3.org/2001/XMLSchema" xmlns:flowable="http://flowable.org/bpmn" xmlns:bpmndi="http://www.omg.org/spec/BPMN/20100524/DI" xmlns:omgdc="http://www.omg.org/spec/DD/20100524/DC" xmlns:omgdi="http://www.omg.org/spec/DD/20100524/DI" typeLanguage="http://www.w3.org/2001/XMLSchema" expressionLanguage="http://www.w3.org/1999/XPath" targetNamespace="http://www.flowable.org/processdef">
<process id="StudentLeave" name="学生请假流程" isExecutable="true">
<startEvent id="start" name="开始" flowable:formFieldValidation="true"></startEvent>
<userTask id="apply" name="请假申请" flowable:assignee="${studentUser}" flowable:formFieldValidation="true">
<extensionElements>
<modeler:initiator-can-complete xmlns:modeler="http://flowable.org/modeler"><![CDATA[false]]></modeler:initiator-can-complete>
</extensionElements>
</userTask>
<userTask id="teacherPass" name="老师审批" flowable:candidateGroups="teacher" flowable:formFieldValidation="true"></userTask>
<exclusiveGateway id="judgeTask" name="判断是否大于2天"></exclusiveGateway>
<endEvent id="end" name="结束"></endEvent>
<userTask id="principalPass" name="校长审批" flowable:candidateGroups="principal" flowable:formFieldValidation="true"></userTask>
<sequenceFlow id="principalCheck" name="通过" sourceRef="principalPass" targetRef="end">
<conditionExpression xsi:type="tFormalExpression"><![CDATA[${outcome=='通过'}]]></conditionExpression>
</sequenceFlow>
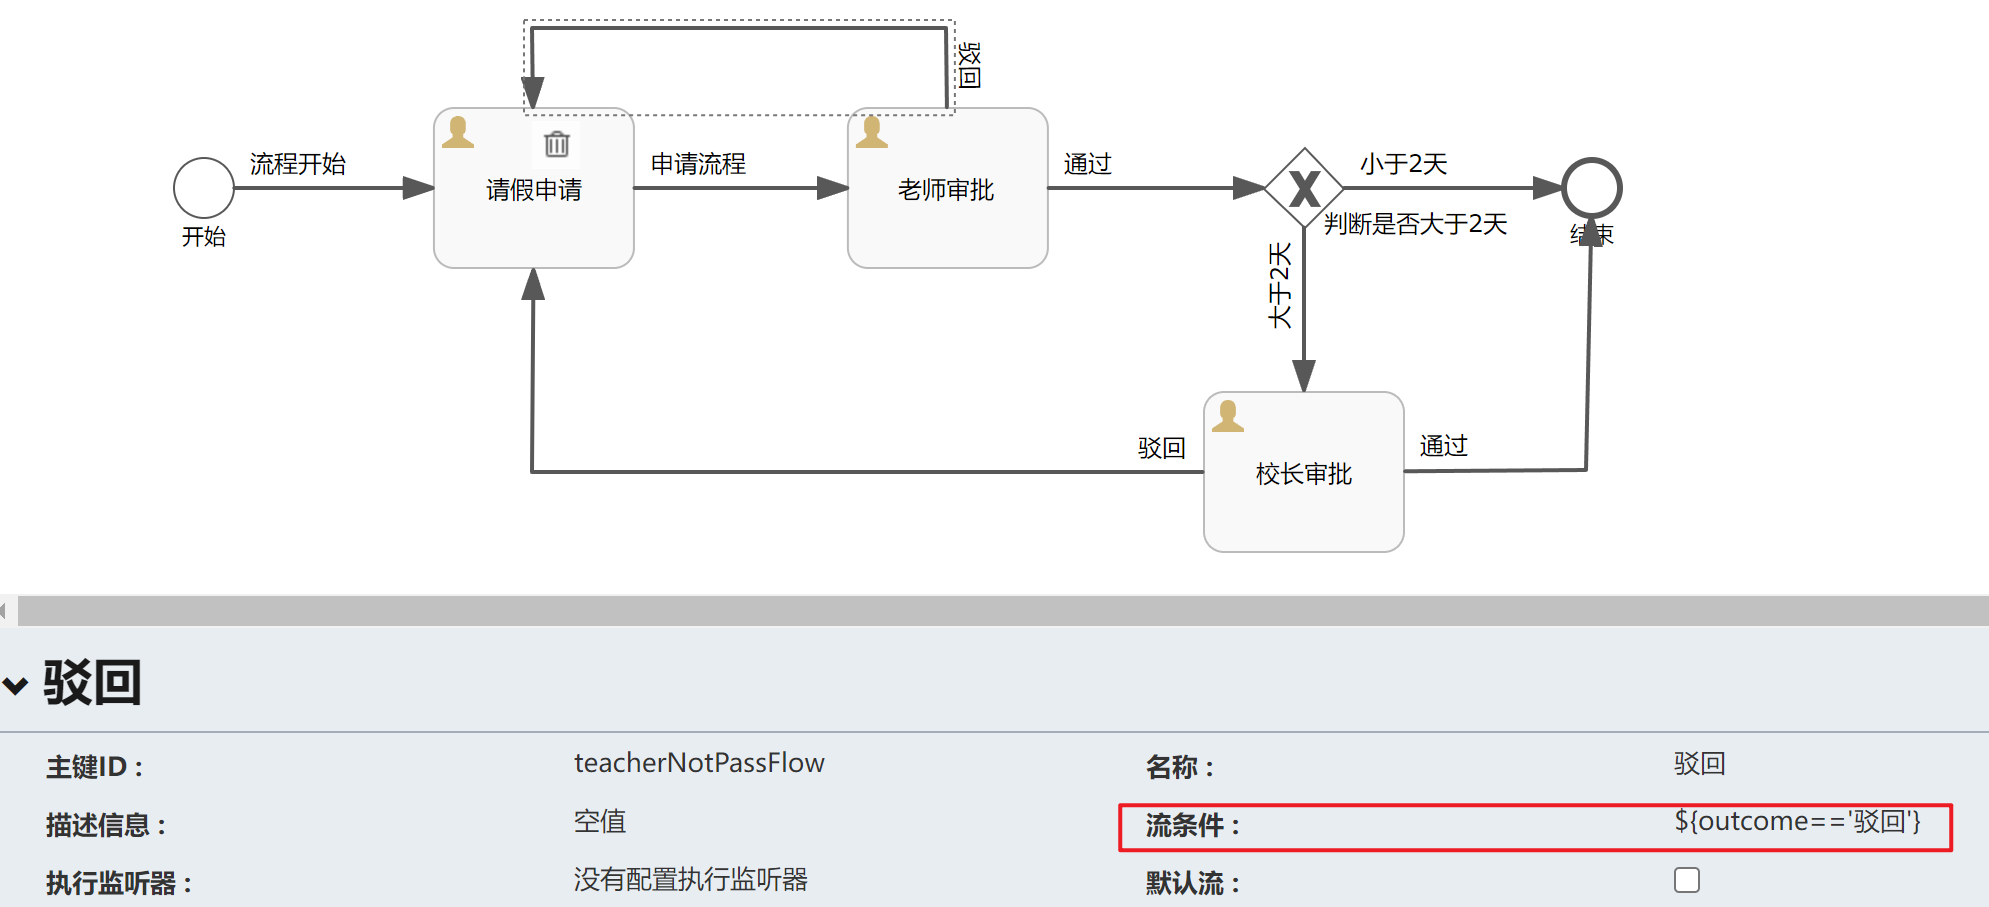
<sequenceFlow id="principalNotPassFlow" name="驳回" sourceRef="principalPass" targetRef="apply">
<conditionExpression xsi:type="tFormalExpression"><![CDATA[${outcome=='驳回'}]]></conditionExpression>
</sequenceFlow>
<sequenceFlow id="teacherPassFlow" name="通过" sourceRef="teacherPass" targetRef="judgeTask">
<conditionExpression xsi:type="tFormalExpression"><![CDATA[${outcome=='通过'}]]></conditionExpression>
</sequenceFlow>
<sequenceFlow id="teacherNotPassFlow" name="驳回" sourceRef="teacherPass" targetRef="apply">
<conditionExpression xsi:type="tFormalExpression"><![CDATA[${outcome=='驳回'}]]></conditionExpression>
</sequenceFlow>
<sequenceFlow id="startFlow" sourceRef="start" name="流程开始" targetRef="apply"></sequenceFlow>
<sequenceFlow id="applyFlow" sourceRef="apply" name="申请流程" targetRef="teacherPass"></sequenceFlow>
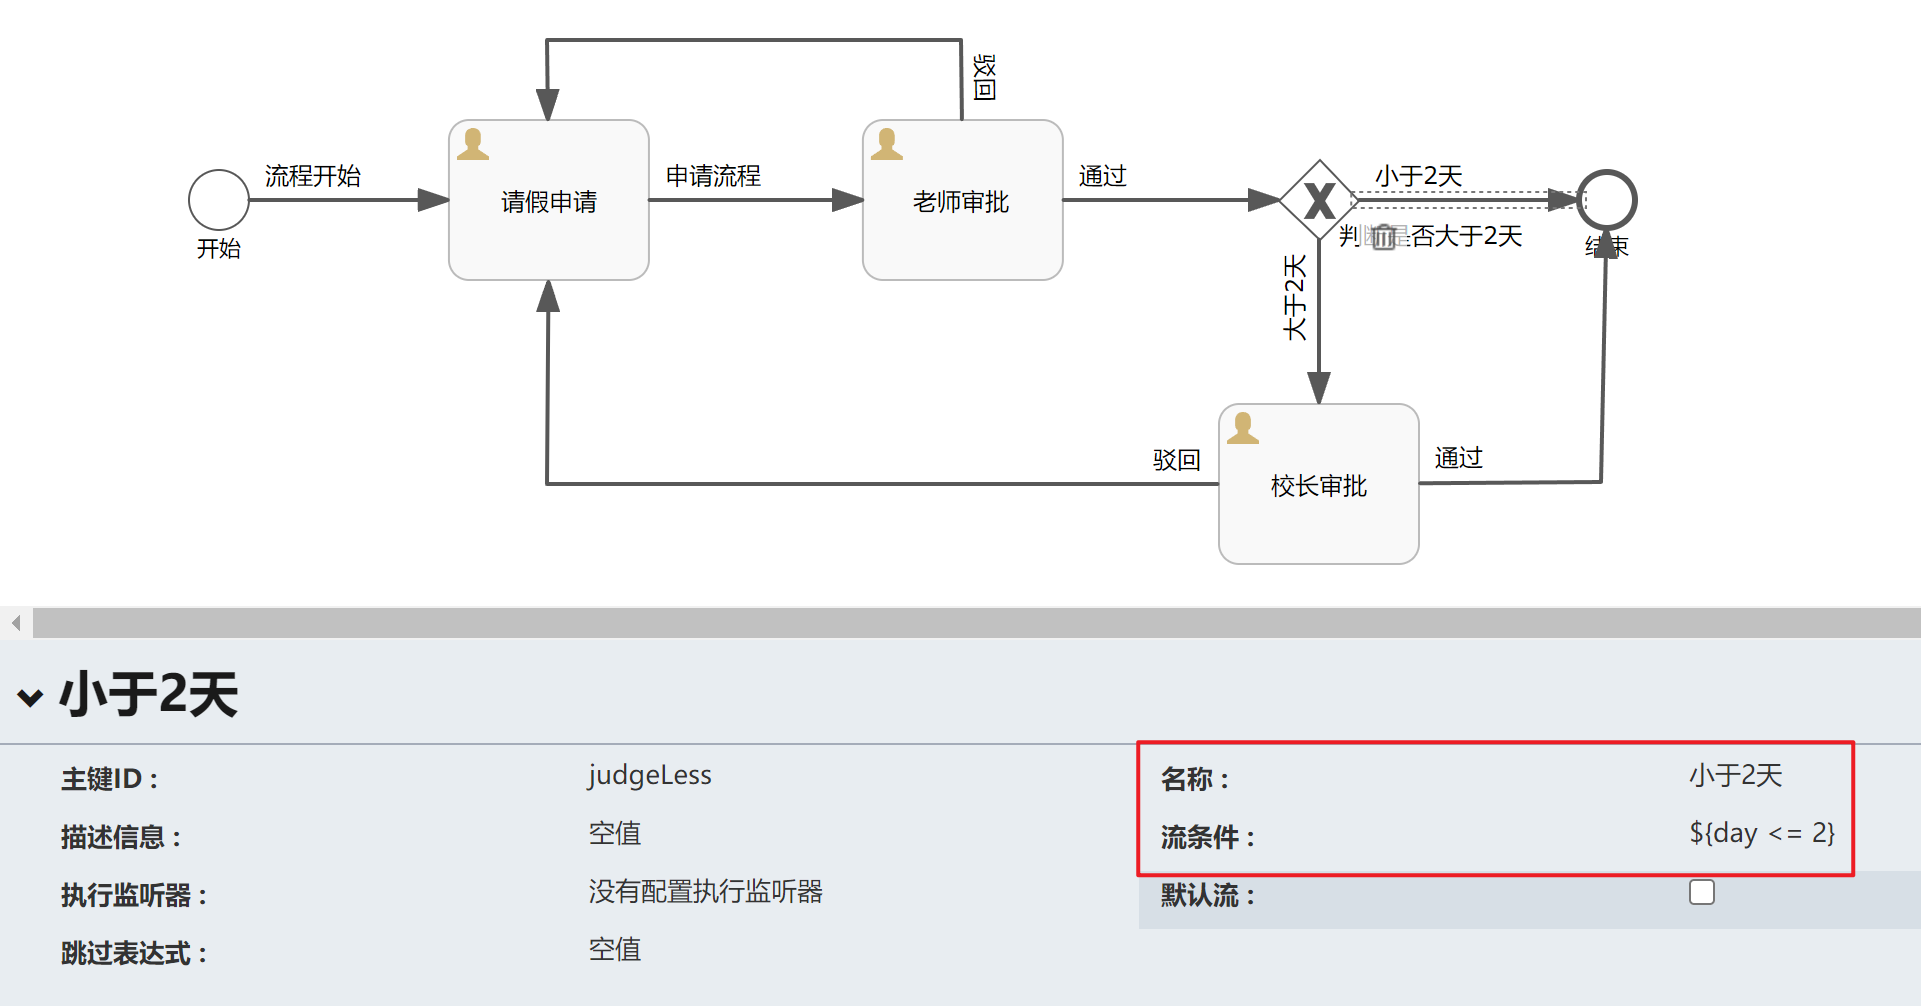
<sequenceFlow id="judgeLess" name="小于2天" sourceRef="judgeTask" targetRef="end">
<conditionExpression xsi:type="tFormalExpression"><![CDATA[${day <= 2}]]></conditionExpression>
</sequenceFlow>
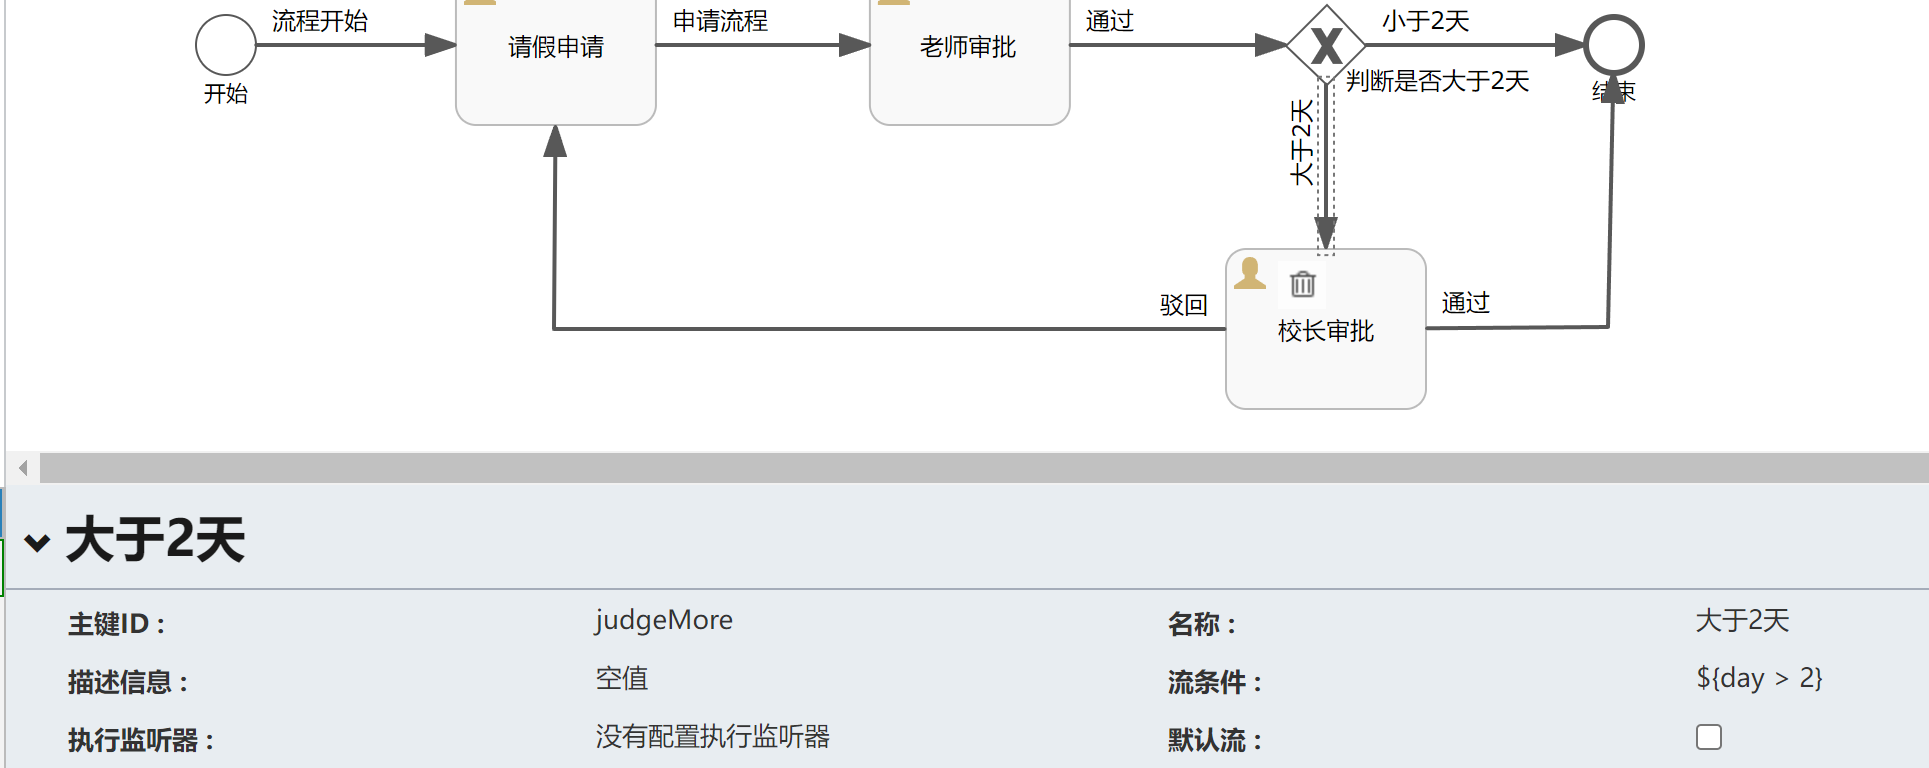
<sequenceFlow id="judgeMore" name="大于2天" sourceRef="judgeTask" targetRef="principalPass">
<conditionExpression xsi:type="tFormalExpression"><![CDATA[${day > 2}]]></conditionExpression>
</sequenceFlow>
</process>
<bpmndi:BPMNDiagram id="BPMNDiagram_StudentLeave">
<bpmndi:BPMNPlane bpmnElement="StudentLeave" id="BPMNPlane_StudentLeave">
<bpmndi:BPMNShape bpmnElement="start" id="BPMNShape_start">
<omgdc:Bounds height="30.0" width="30.0" x="100.0" y="163.0"></omgdc:Bounds>
</bpmndi:BPMNShape>
<bpmndi:BPMNShape bpmnElement="apply" id="BPMNShape_apply">
<omgdc:Bounds height="80.0" width="100.00000000000003" x="229.9708609547486" y="138.0"></omgdc:Bounds>
</bpmndi:BPMNShape>
<bpmndi:BPMNShape bpmnElement="teacherPass" id="BPMNShape_teacherPass">
<omgdc:Bounds height="80.0" width="99.99999999999994" x="436.9446358140222" y="138.0"></omgdc:Bounds>
</bpmndi:BPMNShape>
<bpmndi:BPMNShape bpmnElement="judgeTask" id="BPMNShape_judgeTask">
<omgdc:Bounds height="40.0" width="40.0" x="645.0" y="158.0"></omgdc:Bounds>
</bpmndi:BPMNShape>
<bpmndi:BPMNShape bpmnElement="end" id="BPMNShape_end">
<omgdc:Bounds height="28.0" width="28.0" x="795.0" y="164.0"></omgdc:Bounds>
</bpmndi:BPMNShape>
<bpmndi:BPMNShape bpmnElement="principalPass" id="BPMNShape_principalPass">
<omgdc:Bounds height="80.0" width="100.0" x="615.0" y="280.0"></omgdc:Bounds>
</bpmndi:BPMNShape>
<bpmndi:BPMNEdge bpmnElement="judgeLess" id="BPMNEdge_judgeLess">
<omgdi:waypoint x="684.5095911949685" y="178.43356643356645"></omgdi:waypoint>
<omgdi:waypoint x="795.0000829380081" y="178.04860604497966"></omgdi:waypoint>
</bpmndi:BPMNEdge>
<bpmndi:BPMNEdge bpmnElement="principalNotPassFlow" id="BPMNEdge_principalNotPassFlow">
<omgdi:waypoint x="615.0" y="320.0"></omgdi:waypoint>
<omgdi:waypoint x="279.9708609547486" y="320.0"></omgdi:waypoint>
<omgdi:waypoint x="279.9708609547486" y="217.95000000000002"></omgdi:waypoint>
</bpmndi:BPMNEdge>
<bpmndi:BPMNEdge bpmnElement="judgeMore" id="BPMNEdge_judgeMore">
<omgdi:waypoint x="665.4326241134752" y="197.51043586109145"></omgdi:waypoint>
<omgdi:waypoint x="665.1411660777385" y="280.0"></omgdi:waypoint>
</bpmndi:BPMNEdge>
<bpmndi:BPMNEdge bpmnElement="teacherNotPassFlow" id="BPMNEdge_teacherNotPassFlow">
<omgdi:waypoint x="486.9446358140222" y="138.0"></omgdi:waypoint>
<omgdi:waypoint x="486.9446358140222" y="98.8874737106014"></omgdi:waypoint>
<omgdi:waypoint x="279.9708609547486" y="98.8874737106014"></omgdi:waypoint>
<omgdi:waypoint x="279.9708609547486" y="138.0"></omgdi:waypoint>
</bpmndi:BPMNEdge>
<bpmndi:BPMNEdge bpmnElement="principalCheck" id="BPMNEdge_principalCheck">
<omgdi:waypoint x="714.9499999999886" y="319.64664310954066"></omgdi:waypoint>
<omgdi:waypoint x="806.5" y="319.0"></omgdi:waypoint>
<omgdi:waypoint x="808.7518112709728" y="191.94785201600882"></omgdi:waypoint>
</bpmndi:BPMNEdge>
<bpmndi:BPMNEdge bpmnElement="applyFlow" id="BPMNEdge_applyFlow">
<omgdi:waypoint x="329.9208609546613" y="178.0"></omgdi:waypoint>
<omgdi:waypoint x="436.9446358140222" y="178.0"></omgdi:waypoint>
</bpmndi:BPMNEdge>
<bpmndi:BPMNEdge bpmnElement="teacherPassFlow" id="BPMNEdge_teacherPassFlow">
<omgdi:waypoint x="536.8946358140222" y="178.0"></omgdi:waypoint>
<omgdi:waypoint x="645.0" y="178.0"></omgdi:waypoint>
</bpmndi:BPMNEdge>
<bpmndi:BPMNEdge bpmnElement="startFlow" id="BPMNEdge_startFlow">
<omgdi:waypoint x="129.94999932842546" y="178.0"></omgdi:waypoint>
<omgdi:waypoint x="229.970860954748" y="178.0"></omgdi:waypoint>
</bpmndi:BPMNEdge>
</bpmndi:BPMNPlane>
</bpmndi:BPMNDiagram>
</definitions>
将xml保存为学生请假流程.bpmn20.xml复制到项目resources/processes目录下,如果没有processes文件夹就自己创建一个,Flowable会自动部署processes目录下的流程模型。启动项目后可以通过RepositoryService查询已经部署的模型,若查询结果不为空就代表模型部署成功了。
/**
 * 请假流程控制器
 *
 * @author zed
 * @date 2022/10/07
 */
@RestController
@RequestMapping("leave")
@RequiredArgsConstructor
public class LeaveFlowController {

    private final RepositoryService repositoryService;

    @GetMapping("list")
    public List<String> list() {
        List<ProcessDefinition> processList = repositoryService.createProcessDefinitionQuery().list();
        return processList.stream().map(ProcessDefinition::getName).collect(Collectors.toList());
    }
}
3. 测试流程
package com.qf.flowable;

import org.flowable.engine.HistoryService;
import org.flowable.engine.RuntimeService;
import org.flowable.engine.TaskService;
import org.flowable.engine.history.HistoricActivityInstance;
import org.flowable.engine.runtime.ProcessInstance;
import org.flowable.task.api.Task;
import org.junit.jupiter.api.Test;
import org.springframework.beans.factory.annotation.Autowired;
import org.springframework.boot.test.context.SpringBootTest;

import java.util.HashMap;
import java.util.List;
import java.util.Map;

@SpringBootTest
class FlowableApplicationTests {

    @Autowired
    private RuntimeService runtimeService;

    @Autowired
    private TaskService taskService;

    @Autowired
    private HistoryService historyService;

    @Test
    void contextLoads() {
        // 发起请假
        Map<String, Object> map = new HashMap<>();
        map.put("day", 5);
        map.put("studentUser", "小明");
        ProcessInstance studentLeave = runtimeService.startProcessInstanceByKey("StudentLeave", map);
        Task task = taskService.createTaskQuery().processInstanceId(studentLeave.getId()).singleResult();
        taskService.complete(task.getId());

        // 老师审批
        List<Task> teacherTaskList = taskService.createTaskQuery().taskCandidateGroup("teacher").list();
        Map<String, Object> teacherMap = new HashMap<>();
        teacherMap.put("outcome", "通过");
        for (Task teacherTask : teacherTaskList) {
            taskService.complete(teacherTask.getId(), teacherMap);
        }

        // 校长审批
        List<Task> principalTaskList = taskService.createTaskQuery().taskCandidateGroup("principal").list();
        Map<String, Object> principalMap = new HashMap<>();
        principalMap.put("outcome", "通过");
        for (Task principalTask : principalTaskList) {
            taskService.complete(principalTask.getId(), principalMap);
        }

        // 查看历史
        List<HistoricActivityInstance> activities = historyService.createHistoricActivityInstanceQuery()
                .processInstanceId(studentLeave.getId())
                .finished()
                .orderByHistoricActivityInstanceEndTime().asc()
                .list();
        for (HistoricActivityInstance activity : activities) {
            System.out.println(activity.getActivityName());
        }

    }

}
打印结果:
开始
流程开始
请假申请
申请流程
老师审批
通过
判断是否大于2天
小于2天
结束
将请假日期day改为5,打印结果:
开始
流程开始
请假申请
申请流程
老师审批
通过
判断是否大于2天
大于2天
校长审批
通过
结束
六、流程详解
部署流程定义
将流程定义部署至Flowable引擎,需要使用RepositoryService
通过API查询验证流程定义已经部署在引擎中。通过RepositoryService创建的ProcessDefinitionQuery对象实现。
@GetMapping("list")
public List<String> list() {
    List<ProcessDefinition> processList = repositoryService.createProcessDefinitionQuery().list();
    return processList.stream().map(ProcessDefinition::getName).collect(Collectors.toList());
}
启动流程实例
现在已经在流程引擎中部署了流程定义,因此可以使用这个流程定义作为“蓝图”启动流程实例。
我们使用RuntimeService启动一个流程实例。
收集的数据作为一个java.util.Map实例传递,其中的键就是之后用于获取变量的标识符。
<!-- 这两个就是在XML文件钟定义的变量 -->
flowable:assignee="${studentUser}"
${outcome=='通过'}
${day <= 2}
这个流程实例使用key启动。这个key就是BPMN 2.0 XML文件中设置的id属性,
<process id="StudentLeave" name="学生请假流程" isExecutable="true">
在这个例子里是StudentLeave。
Map<String, Object> map = new HashMap<>();
map.put("day", 2);
map.put("studentUser", "小明");
ProcessInstance studentLeave = runtimeService.startProcessInstanceByKey("StudentLeave", map);
在流程实例启动后,会创建一个执行(execution),并将其放在启动事件上。从这里开始,这个执行沿着顺序流移动到教师审批的用户任务,并执行用户任务行为。这个行为将在数据库中创建一个任务,该任务可以之后使用查询找到。
查询与完成任务
学生发起请假
我们还没有为用户任务配置办理人。我们想将第一个任务指派给提交请假的学生
添加assignee属性。请注意我们没有使用静态值,而是使用一个流程变量动态指派。
这个流程变量是在流程实例启动时传递的
XML文件中定义的用户任务
<userTask id="apply" name="请假申请" flowable:assignee="${studentUser}" flowable:formFieldValidation="true">
    <extensionElements>
        <modeler:initiator-can-complete xmlns:modeler="http://flowable.org/modeler"><![CDATA[false]]></modeler:initiator-can-complete>
    </extensionElements>
</userTask>
要获得实际的任务列表,需要通过TaskService创建一个TaskQuery。
我们配置这个查询返回刚才创建的活动实例中的任务
Task task = taskService.createTaskQuery().processInstanceId(studentLeave.getId()).singleResult();
// 学生提交请假申请
taskService.complete(task.getId());
老师查看需要处理的任务列表
candidate:英文候选人
<userTask id="teacherPass" name="老师审批" flowable:candidateGroups="teacher" flowable:formFieldValidation="true">
</userTask>
- 查询老师分组的任务:
XML中给任务添加candidateGroups属性,并查询这个组的任务列表
taskService.createTaskQuery().taskCandidateGroup("teacher").list()
获取任务的参数:
// 根据任务ID获取当前任务的参数:
Map<String, Object> variables = taskService.getVariables(task.getId())
详细代码:
 @GetMapping("tasks")
public List<String> teacherTask() {
    List<Task> teacherTaskList = taskService.createTaskQuery().taskCandidateGroup("teacher").list();
    System.out.println("教师有 " + teacherTaskList.size() + " 个任务需要处理:");
    // 返回任务详情
    return teacherTaskList.stream().map(task -> {
        String title = String.format("任务名称:%s  ", task.getName());
        Map<String, Object> variables = taskService.getVariables(task.getId());
        String info = String.format("详情:%s请假%s天", variables.get("studentUser"), variables.get("day"));
        return title + info;
    }).collect(Collectors.toList());
}
- 老师审批任务
核心代码:
// 第一个参数任务ID 第二个参数任务变量
taskService.complete(teacherTask.getId(), teacherMap);
XML流程文件:
<sequenceFlow id="principalCheck" name="通过" sourceRef="principalPass" targetRef="end">
    <conditionExpression xsi:type="tFormalExpression"><![CDATA[${outcome=='通过'}]]></conditionExpression>
</sequenceFlow>

<sequenceFlow id="principalNotPassFlow" name="驳回" sourceRef="principalPass" targetRef="apply">
    <conditionExpression xsi:type="tFormalExpression"><![CDATA[${outcome=='驳回'}]]></conditionExpression>
</sequenceFlow>
完整代码:
@PostMapping("confirm")
public String teacherConfirm(String outcome) {
    // 老师审批
    List<Task> teacherTaskList = taskService.createTaskQuery().taskCandidateGroup("teacher").list();
    Map<String, Object> teacherMap = new HashMap<>();
    // teacherMap.put("outcome", "通过");
    teacherMap.put("outcome", outcome);
    for (Task teacherTask : teacherTaskList) {
        taskService.complete(teacherTask.getId(), teacherMap);
    }
    return "SUCCESS";
}
现在任务完成,并会在离开排他网关的两条路径中,基于’outcome’流程变量选择一条。
校长审批代码类似
使用历史数据
Flowable可以自动存储所有流程实例的数据。
例如,如果希望显示流程实例已经执行的时间,就可以从historyService创建*历史活动(historical activities)*的查询。在下面的代码片段中,可以看到我们添加了一些额外的过滤条件:
- 只选择一个特定流程实例的活动
- 只选择已完成的活动
结果按照结束时间排序,代表其执行顺序。
@GetMapping("history")
public List<String> history() {
    List<ProcessInstance> processInstance = runtimeService.createProcessInstanceQuery().processDefinitionKey(STUDENT_LEAVE).orderByStartTime().desc().list();
    if (CollectionUtils.isEmpty(processInstance)) {
        return Collections.emptyList();
    }

    // 获取最近的一个流程
    List<HistoricActivityInstance> activities = historyService.createHistoricActivityInstanceQuery()
        .processInstanceId(processInstance.get(0).getId())
        // 只查询已经完成的活动
        .finished()
        // 按照结束时间排序
        .orderByHistoricActivityInstanceEndTime().desc()
        .list();
    return activities.stream().map(a -> "活动名称:" + a.getActivityName() + ";活动执行时间:" + a.getDurationInMillis() + "毫秒").collect(Collectors.toList());
}
运行代码,可以看到活动的名称执行时间等
[
  "活动名称:开始;活动执行时间:0毫秒",
  "活动名称:流程开始;活动执行时间:0毫秒",
  "活动名称:请假申请;活动执行时间:18毫秒",
  "活动名称:申请流程;活动执行时间:0毫秒",
  "活动名称:老师审批;活动执行时间:42908毫秒",
  "活动名称:通过;活动执行时间:0毫秒",
  "活动名称:判断是否大于2天;活动执行时间:1毫秒",
  "活动名称:大于2天;活动执行时间:0毫秒"
]
七、Flowable Modeler
Spring Boot 整合 Flowable Modeler
Flowable Modeler用于建模BPMN流程、DMN选择表、表单定义,以及创建应用定义。BPMN Modeler使用与Flowable 5相同的Oryx与Angular架构,只是迁移为独立的Modeler应用中。
八、部署
Flowable Modeler应用: 建议是单独部署!
1. 添加依赖
在使用Flowable Modeler应用时,要先部署Flowable IDM应用。
Flowable IDM应用,用于其他三个Flowable web应用的认证与授权。因此如果你想要运行Modeler,Task或者Admin应用,就需要运行IDM应用。Flowable IDM应用是一个简单的身份管理应用,目标是为Flowable web应用提供单点登录能力,并提供定义用户、组与权限的能力。
所以要同时加入IDM和Modeler两个包
<!-- idm依赖提供身份认证 -->
<dependency>
    <groupId>org.flowable</groupId>
    <artifactId>flowable-spring-boot-starter-ui-idm</artifactId>
    <version>6.7.1</version>
</dependency>

<!-- modeler绘制流程图 -->
<dependency>
    <groupId>org.flowable</groupId>
    <artifactId>flowable-spring-boot-starter-ui-modeler</artifactId>
    <version>6.7.1</version>
</dependency>

<!-- jpa -->
<dependency>
    <groupId>org.springframework.boot</groupId>
    <artifactId>spring-boot-starter-data-jpa</artifactId>
</dependency>

<!-- mysql驱动 -->
<dependency>
    <groupId>mysql</groupId>
    <artifactId>mysql-connector-java</artifactId>
</dependency>

<!-- flowable -->
<dependency>
    <groupId>org.flowable</groupId>
    <artifactId>flowable-spring-boot-starter</artifactId>
    <version>6.7.1</version>
</dependency>
2. 添加配置
配置账号密码
flowable:
  idm:
    app:
      admin:
        # 登录的用户名
        user-id: admin
        # 登录的密码
        password: admin
        # 用户的名字
        first-name: zhao
        last-name: dong
spring:
  datasource:
    url: jdbc:mysql://localhost:3306/flowable?serverTimezone=Asia/Shanghai&allowMultiQueries=true&useUnicode=true&characterEncoding=UTF-8
    username: root
    password: root
    driver-class-name: com.mysql.cj.jdbc.Driver
  jpa:
    properties:
      hibernate:
        hbm2ddl:
          auto: update
        dialect: org.hibernate.dialect.MySQL5InnoDBDialect
    open-in-view: true
3. 用户登录
加入依赖和配置后就基本OK了,启动项目访问地址:
http://localhost:8080
登录界面

主页面
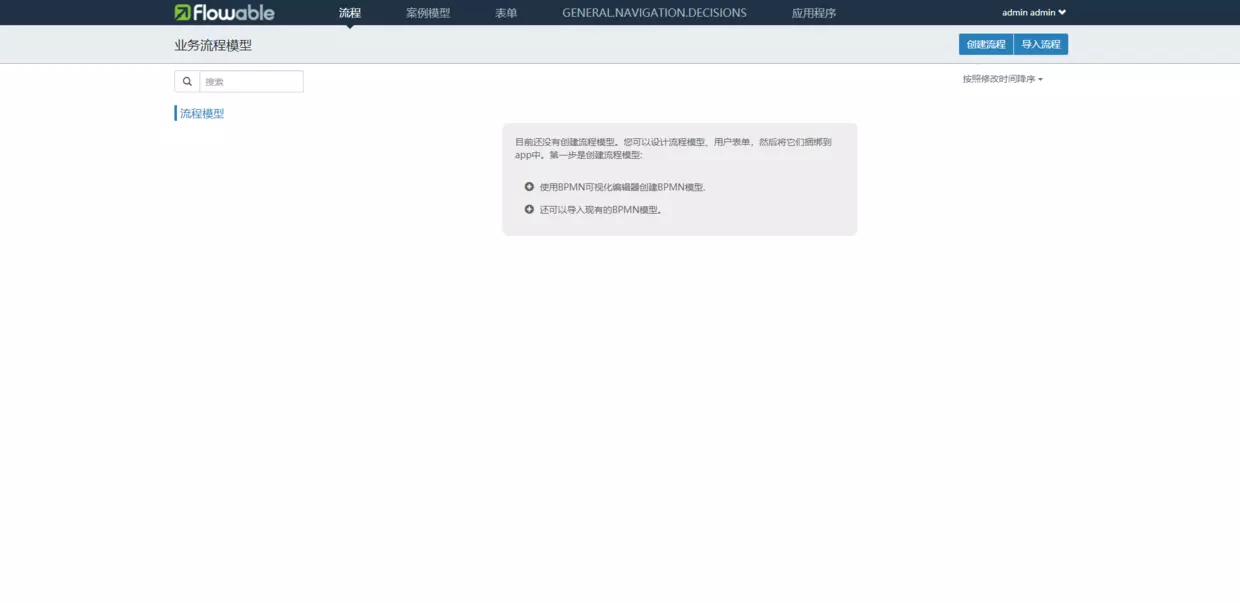
请假流程界面:

4.绘制流程图
可以在UI界面中导入流程图,新建/编辑流程图,导出流程图
- 在任一节点双击,添加名称
- 单击节点,可设置节点属性
| 分配人 |
|---|
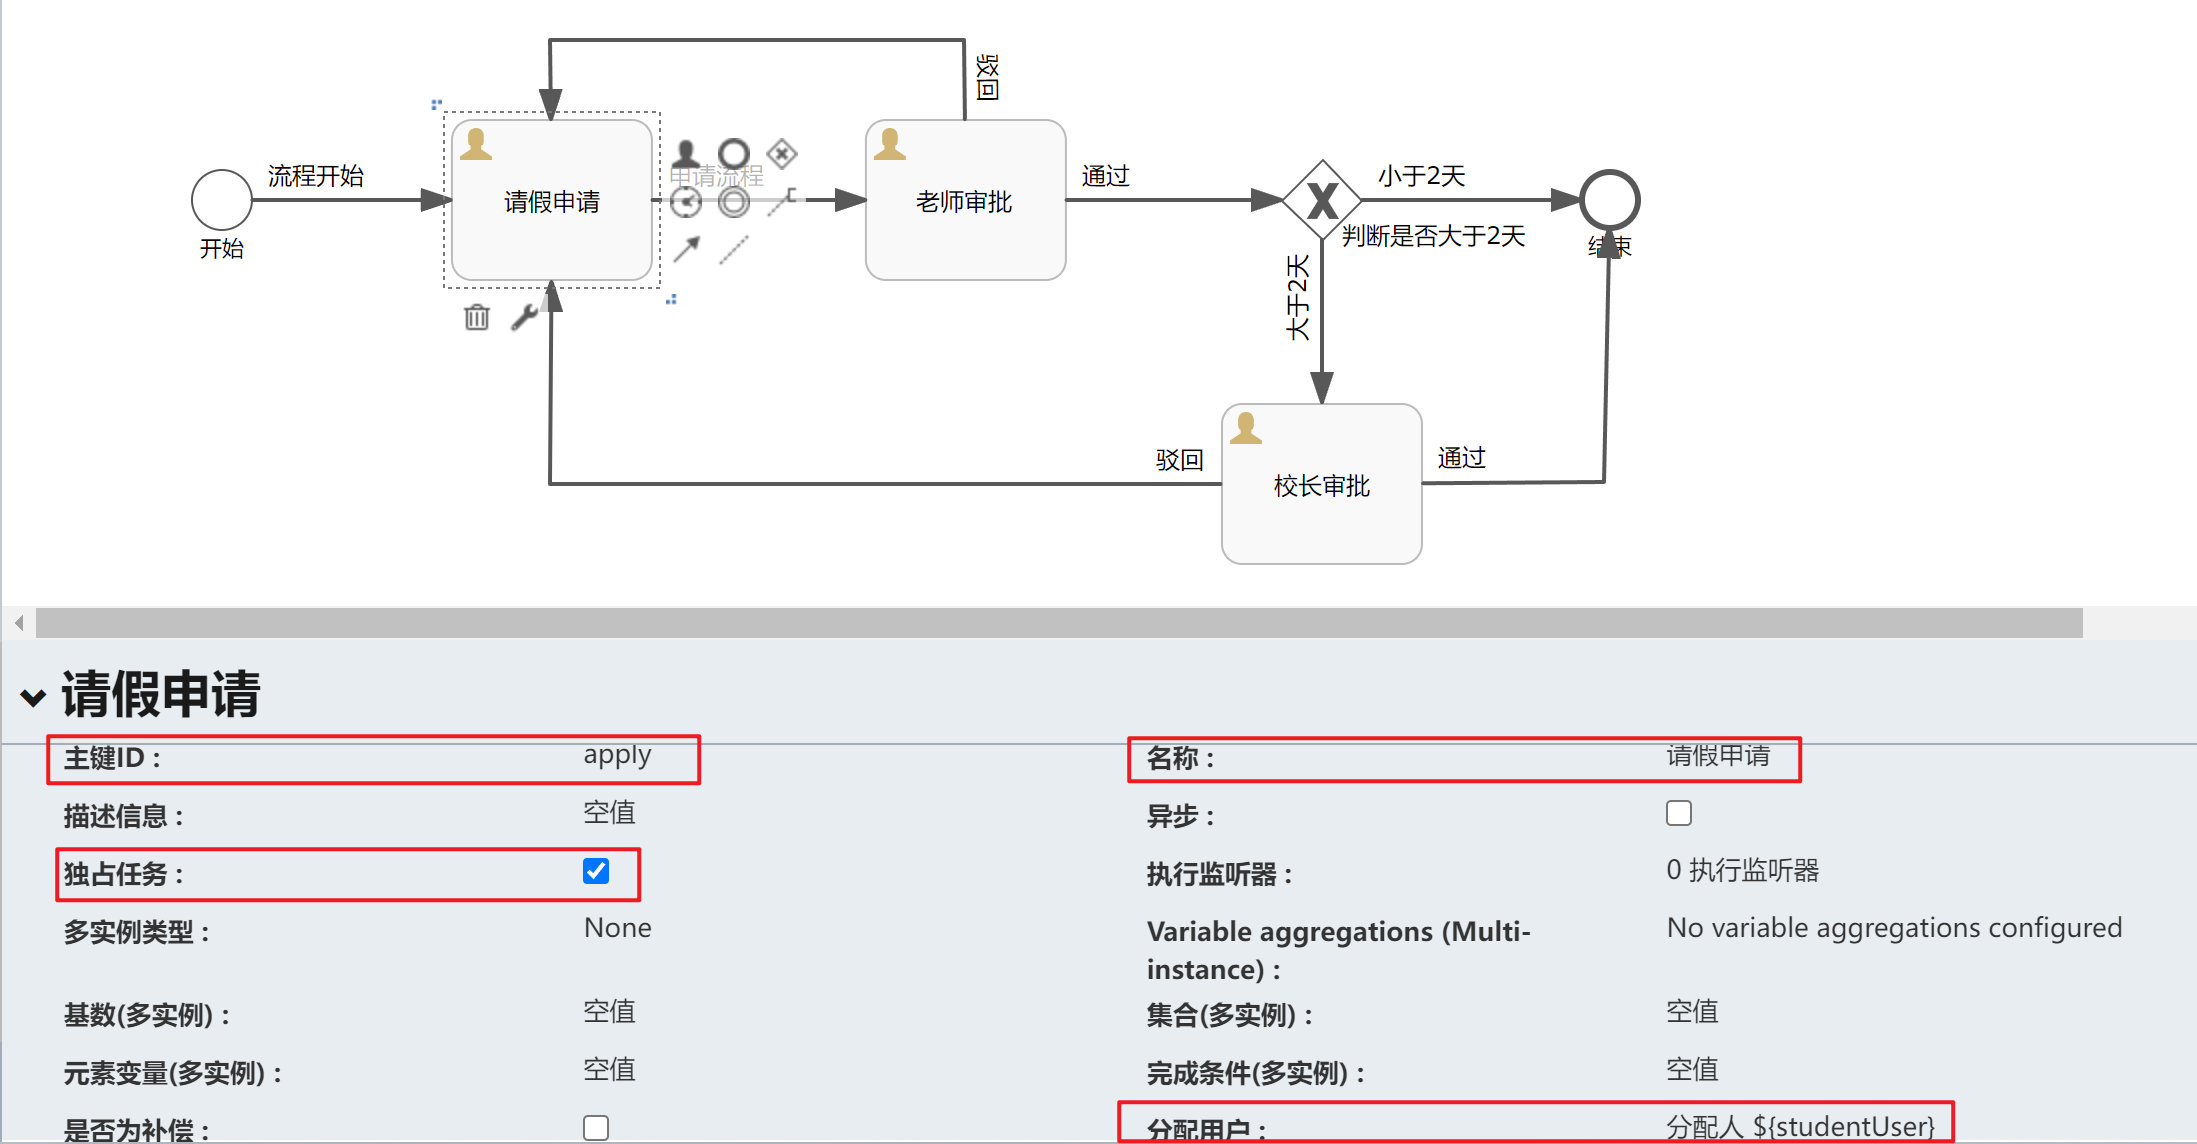 |
| 申请流程 |
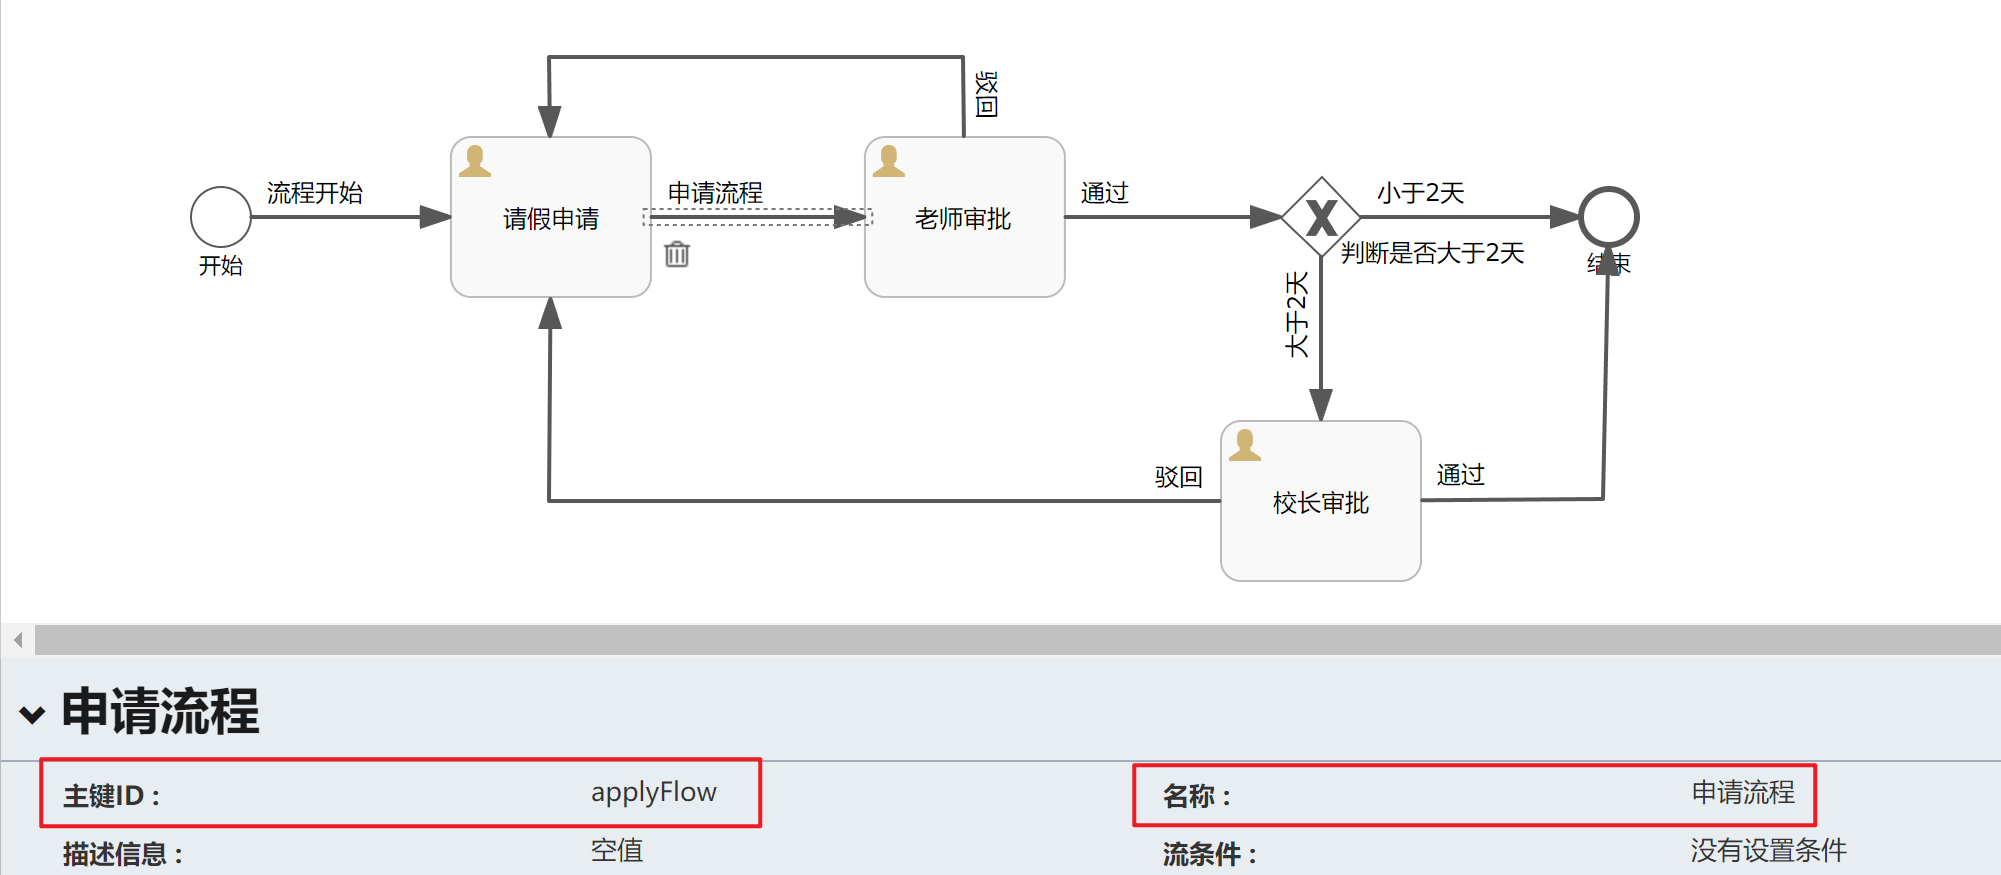 |
| 老师审批 |
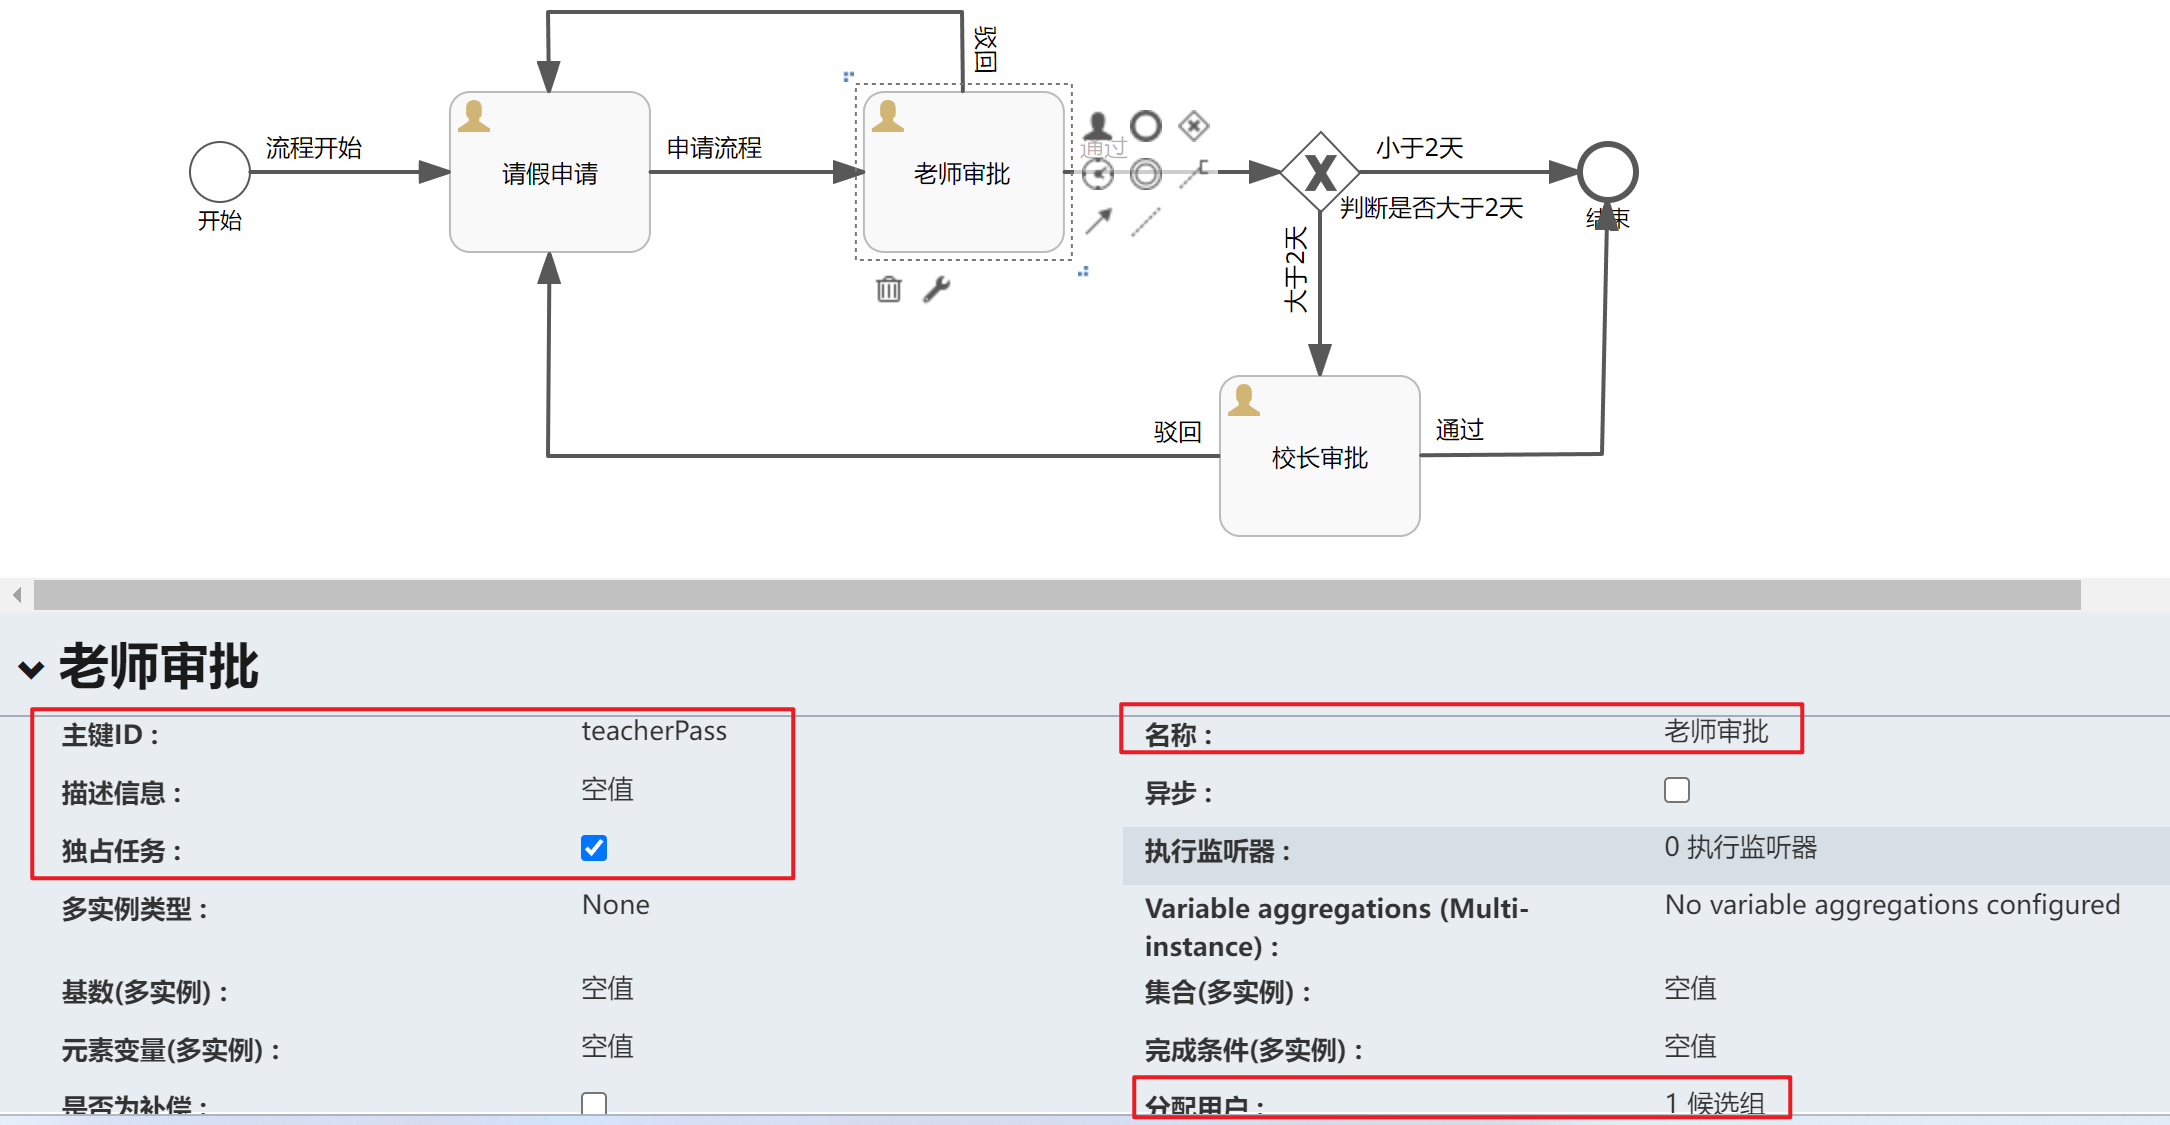 |
| 分配用户 |
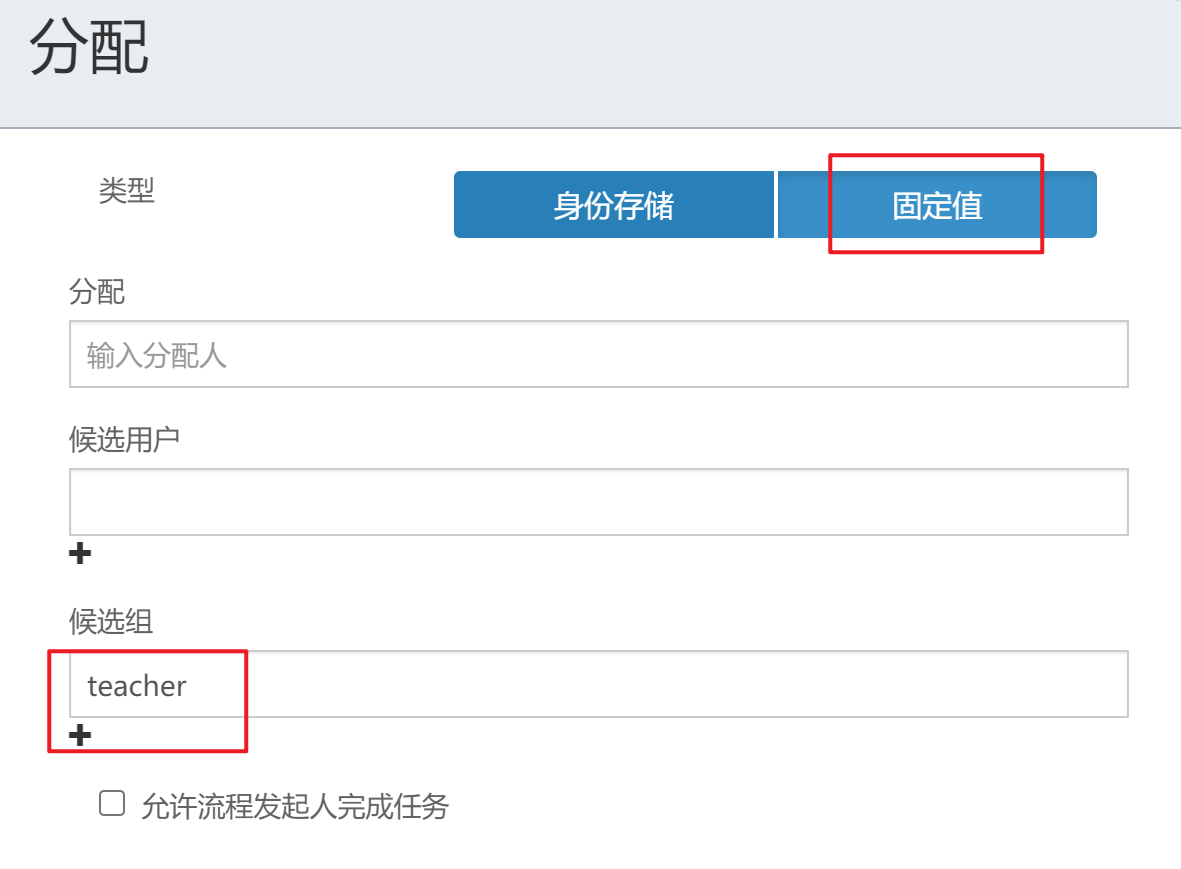 |
流条件
| 通过 |
|---|
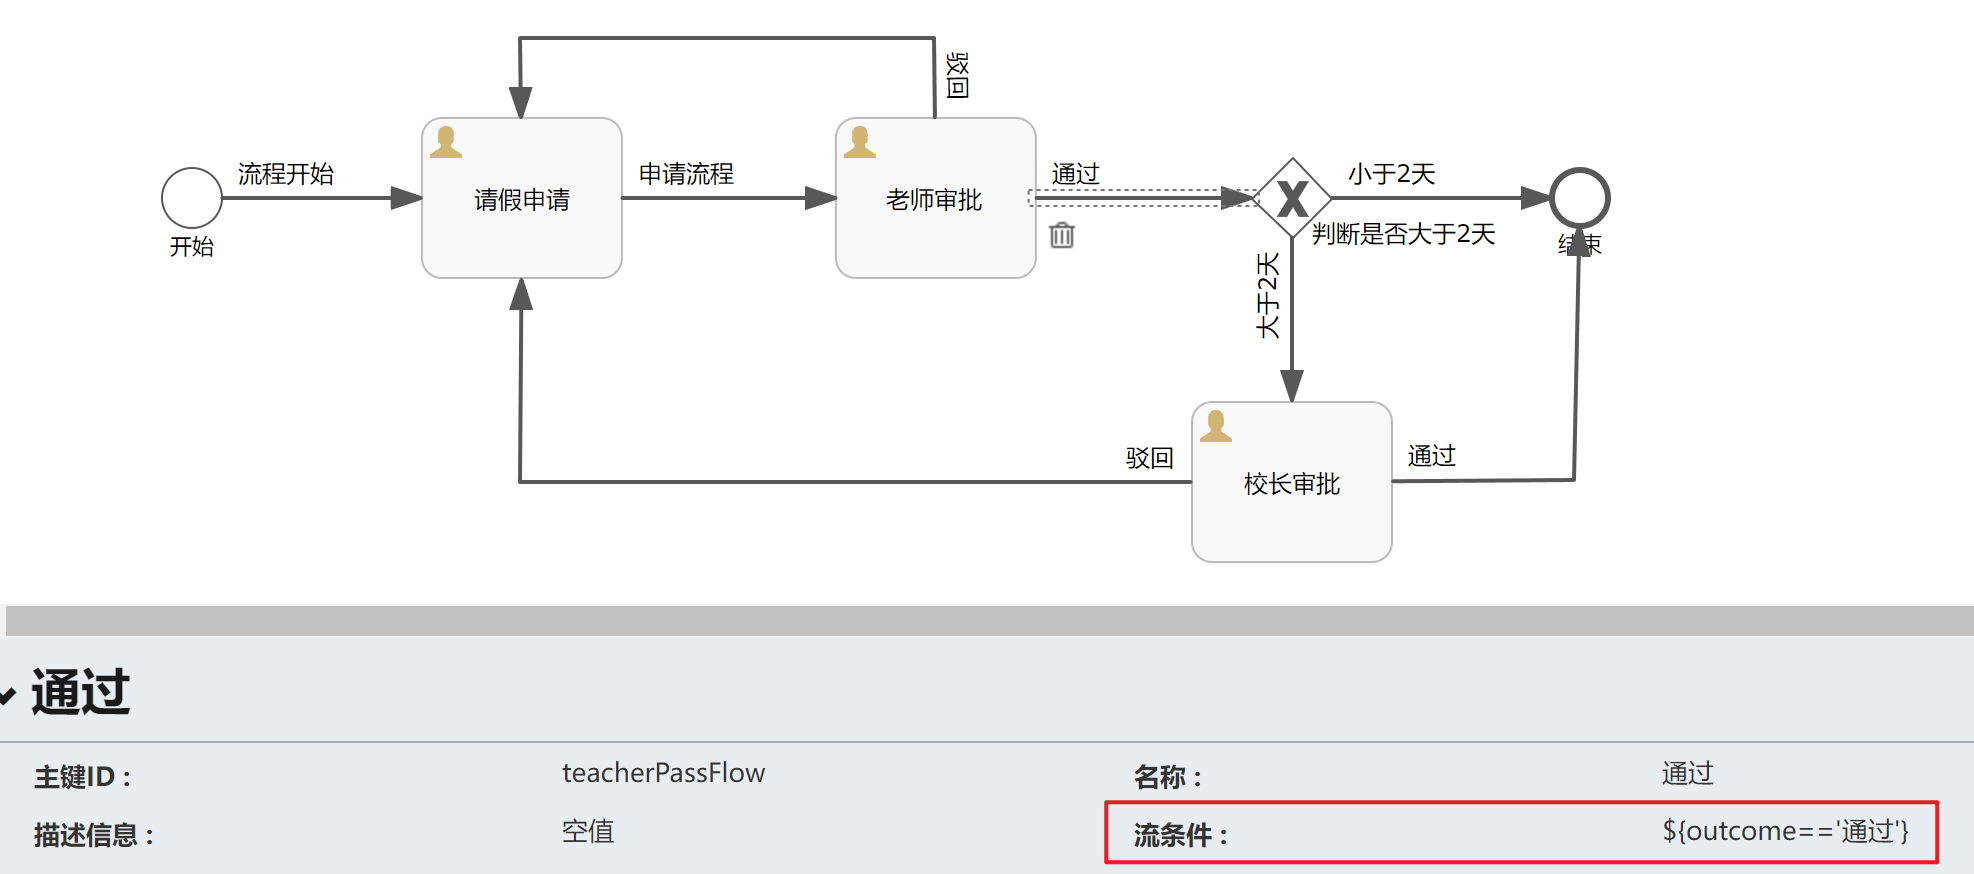 |
| 驳回 |
 |
排他网关
| 网关节点 |
|---|
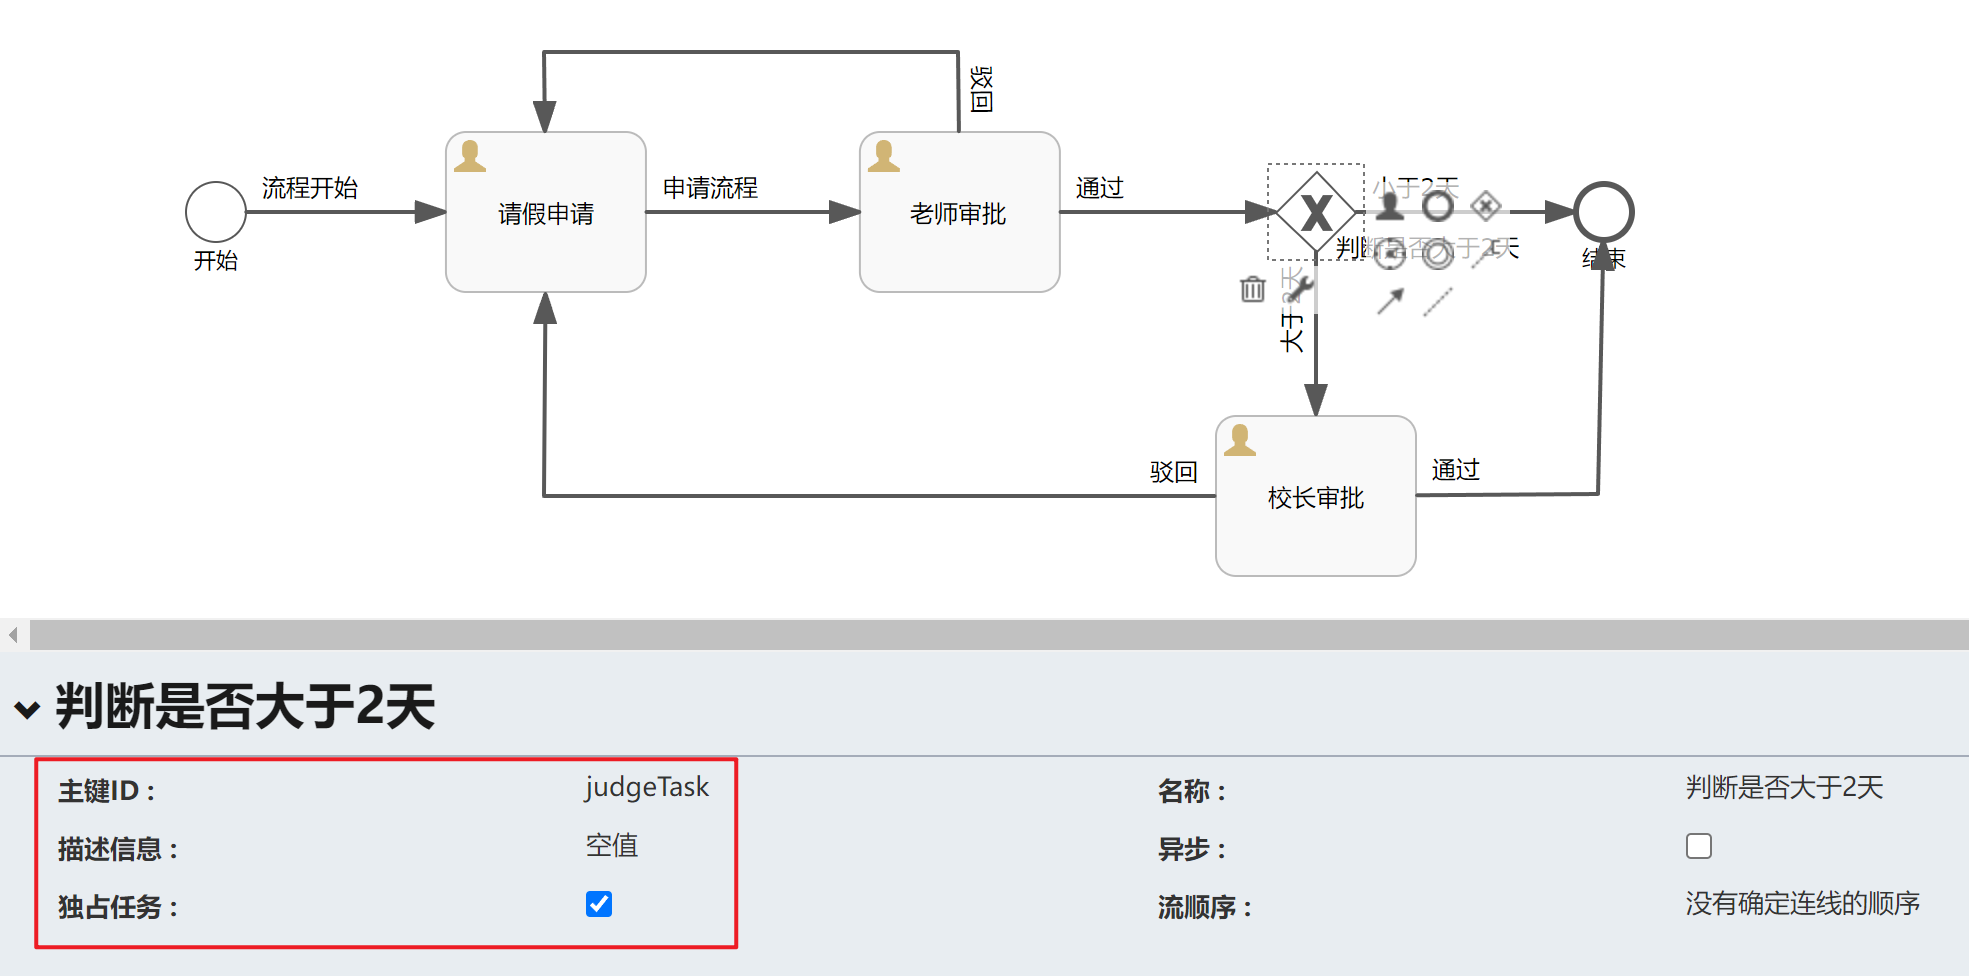 |
| 小于2天 |
 |
| 大于2天 |
 |
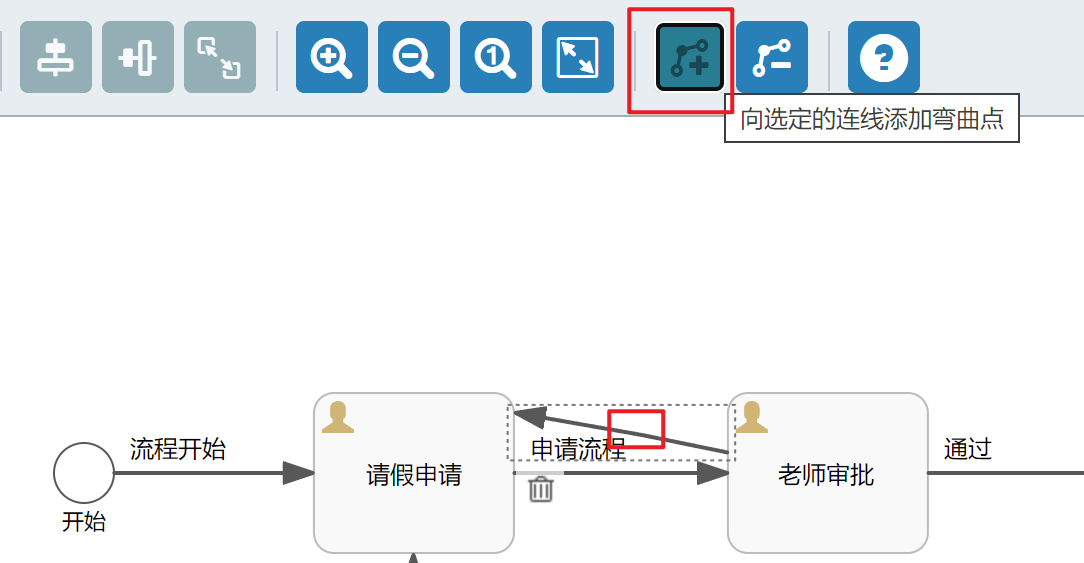
连线绘制
| 拖拽箭头到目标后松开 |
|---|
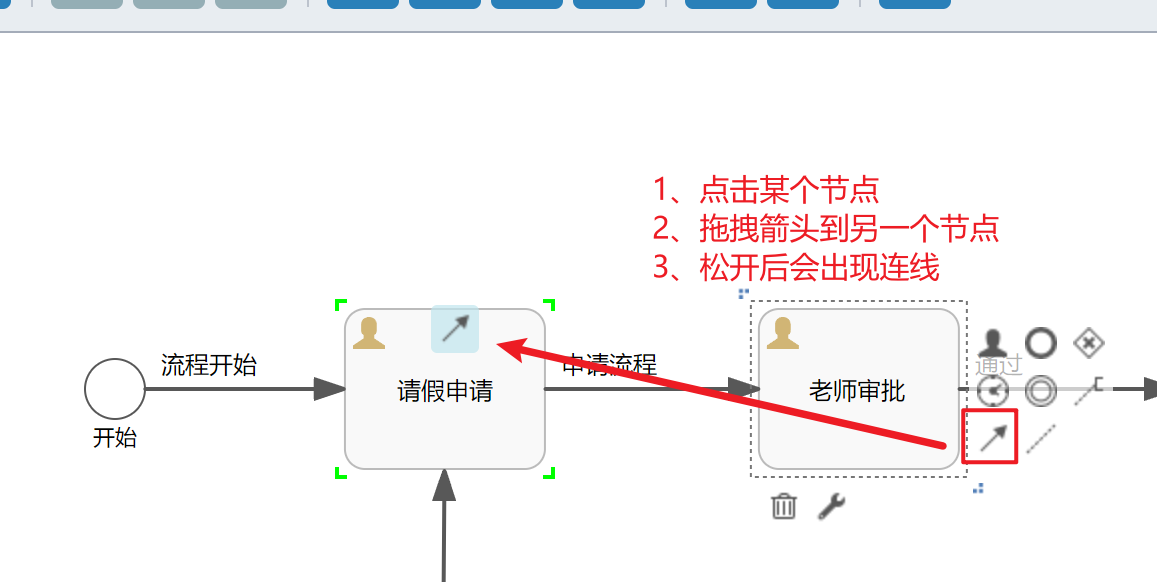 |
| 添加弯曲点,拖拽弯曲点形成折线 |
 |
5.导出流程图

九、附录
1. 数据表说明
Flowable的所有数据库表都以ACT_开头。第二部分是说明表用途的两字符标示符。服务API的命名也大略符合这个规则。
- ACT_RE_* :’ RE ’表示repository(存储)。RepositoryService接口操作的表。带此前缀的表包含的是静态信息,如,流程定义,流程的资源(图片,规则等)。
- ACT_RU_* :’ RU ’表示runtime。这是运行时的表存储着流程变量,用户任务,变量,职责(job)等运行时的数据。flowable只存储实例执行期间的运行时数据,当流程实例结束时,将删除这些记录。这就保证了这些运行时的表小且快。
- ACT_ID_* : ’ ID ’表示identity(组织机构)。这些表包含标识的信息,如用户,用户组,等等。
- ACT_HI_* : ’ HI ’表示history。就是这些表包含着历史的相关数据,如结束的流程实例,变量,任务,等等。
- ACT_GE_* : 普通数据,各种情况都使用的数据。
| 表分类 | 表名 | 表说明 |
|---|---|---|
| 一般数据 | ACT_GE_BYTEARRAY | 通用的流程定义和流程资源 |
| ACT_GE_PROPERTY | 系统相关属性 | |
| 流程历史记录 | ACT_HI_ACTINST | 历史的流程实例 |
| ACT_HI_ATTACHMENT | 历史的流程附件 | |
| ACT_HI_COMMENT | 历史的说明性信息 | |
| ACT_HI_DETAIL | 历史的流程运行中的细节信息 | |
| ACT_HI_IDENTITYLINK | 历史的流程运行过程中用户关系 | |
| ACT_HI_PROCINST | 历史的流程实例 | |
| ACT_HI_TASKINST | 历史的任务实例 | |
| ACT_HI_VARINST | 历史的流程运行中的变量信息 | |
| 用户用户组表 | ACT_ID_BYTEARRAY | 二进制数据表 |
| ACT_ID_GROUP | 用户组信息表 | |
| ACT_ID_INFO | 用户信息详情表 | |
| ACT_ID_MEMBERSHIP | 人与组关系表 | |
| ACT_ID_PRIV | 权限表 | |
| ACT_ID_PRIV_MAPPING | 用户或组权限关系表 | |
| ACT_ID_PROPERTY | 属性表 | |
| ACT_ID_TOKEN | 系统登录日志表 | |
| ACT_ID_USER | 用户表 | |
| 流程定义表 | ACT_RE_DEPLOYMENT | 部署单元信息 |
| ACT_RE_MODEL | 模型信息 | |
| ACT_RE_PROCDEF | 已部署的流程定义 | |
| 运行实例表 | ACT_RU_DEADLETTER_JOB | 正在运行的任务表 |
| ACT_RU_EVENT_SUBSCR | 运行时事件 | |
| ACT_RU_EXECUTION | 运行时流程执行实例 | |
| ACT_RU_HISTORY_JOB | 历史作业表 | |
| ACT_RU_IDENTITYLINK | 运行时用户关系信息 | |
| ACT_RU_JOB | 运行时作业表 | |
| ACT_RU_SUSPENDED_JOB | 暂停作业表 | |
| ACT_RU_TASK | 运行时任务表 | |
| ACT_RU_TIMER_JOB | 定时作业表 | |
| ACT_RU_VARIABLE | 运行时变量表 | |
| 其他表 | ACT_EVT_LOG | 事件日志表 |
| ACT_PROCDEF_INFO | 流程定义信息 |