Seata
小结
nacos 【name server】:注册中心,解决服务的注册与发现
nacos【config】:配置中心,微服务配置文件的中心化管理,同时配置信息的动态刷新
Ribbon:客户端负载均衡器,解决微服务集群负载均衡的问题
Openfeign:声明式HTTP客户端,解决微服务之间远程调用问题
Sentinel:微服务流量防卫兵,以流量为入口,保护微服务,防止服务雪崩
gateway:微服务网关,服务集群的入口,路由转发以及负载均衡(全局认证、流控)
sleuth:链路追踪
seata:分布式事务解决方案
一:分布式事务简介
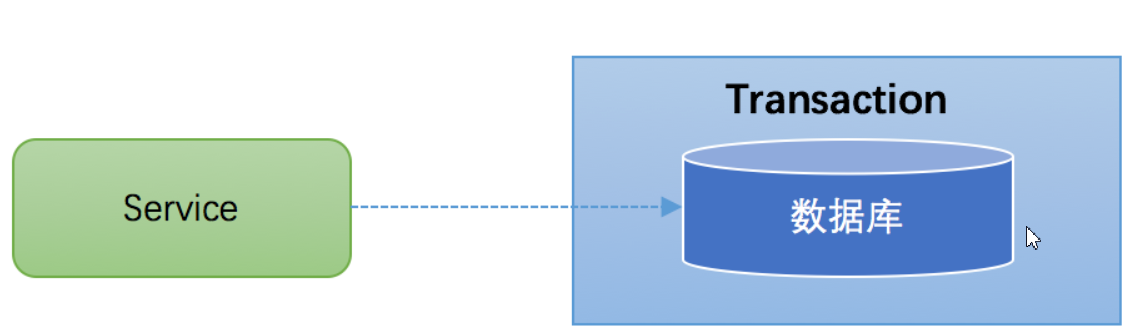
1.1:本地事务
单服务进程,单数据库资源,同一个连接conn多个事务操作
在JDBC编程中,我们通过java.sql.Connection对象来开启、关闭或者提交事务。代码如下所示:
Connection conn = ... //获取数据库连接
conn.setAutoCommit(false); //开启事务
try{
    //1:张三-100
    //2:李四+100
    //3.其他操作10/0
    conn.commit(); //提交事务
}catch (Exception e) {
    conn.rollback();//事务回滚
}finally{
    conn.close();//关闭链接
}
Spring声明式事务(基于aop实现)
/**
  * @param fromUserName 转账人
  * @param toUserName 被转账人
  * @param changeSal 转账额度
  */
@Transactional(rollbackFor = Exception.class)
public void changeSal(String fromUserName,String toUserName,int changeSal) {
    bankMapper.updateSal(fromUserName, -1 * changeSal);
    bankMapper.updateSal(toUserName, changeSal);
    int i = 10/0
}
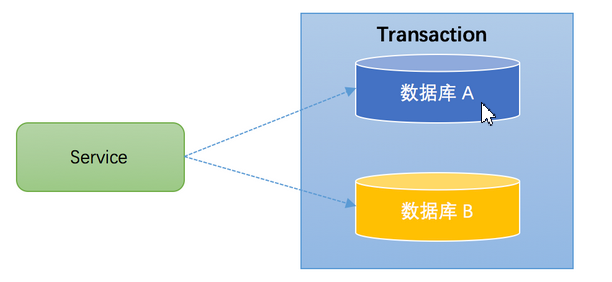
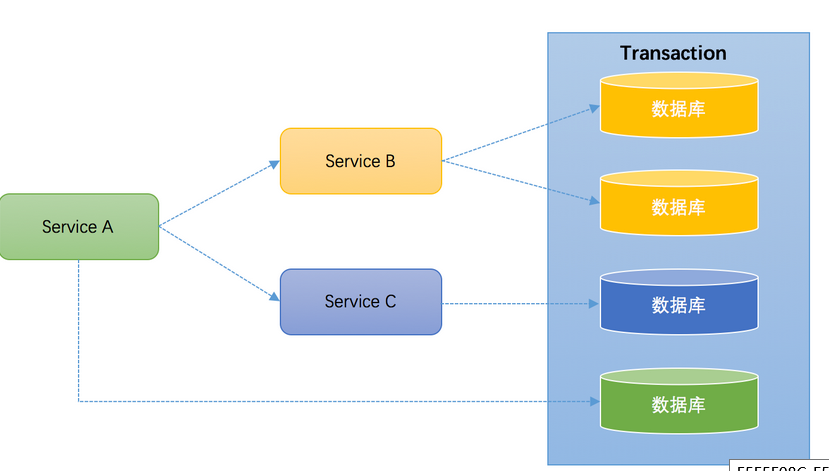
1.2:分布式事务
单服务进程,跨库操作
多服务进程 ,多数据库资源
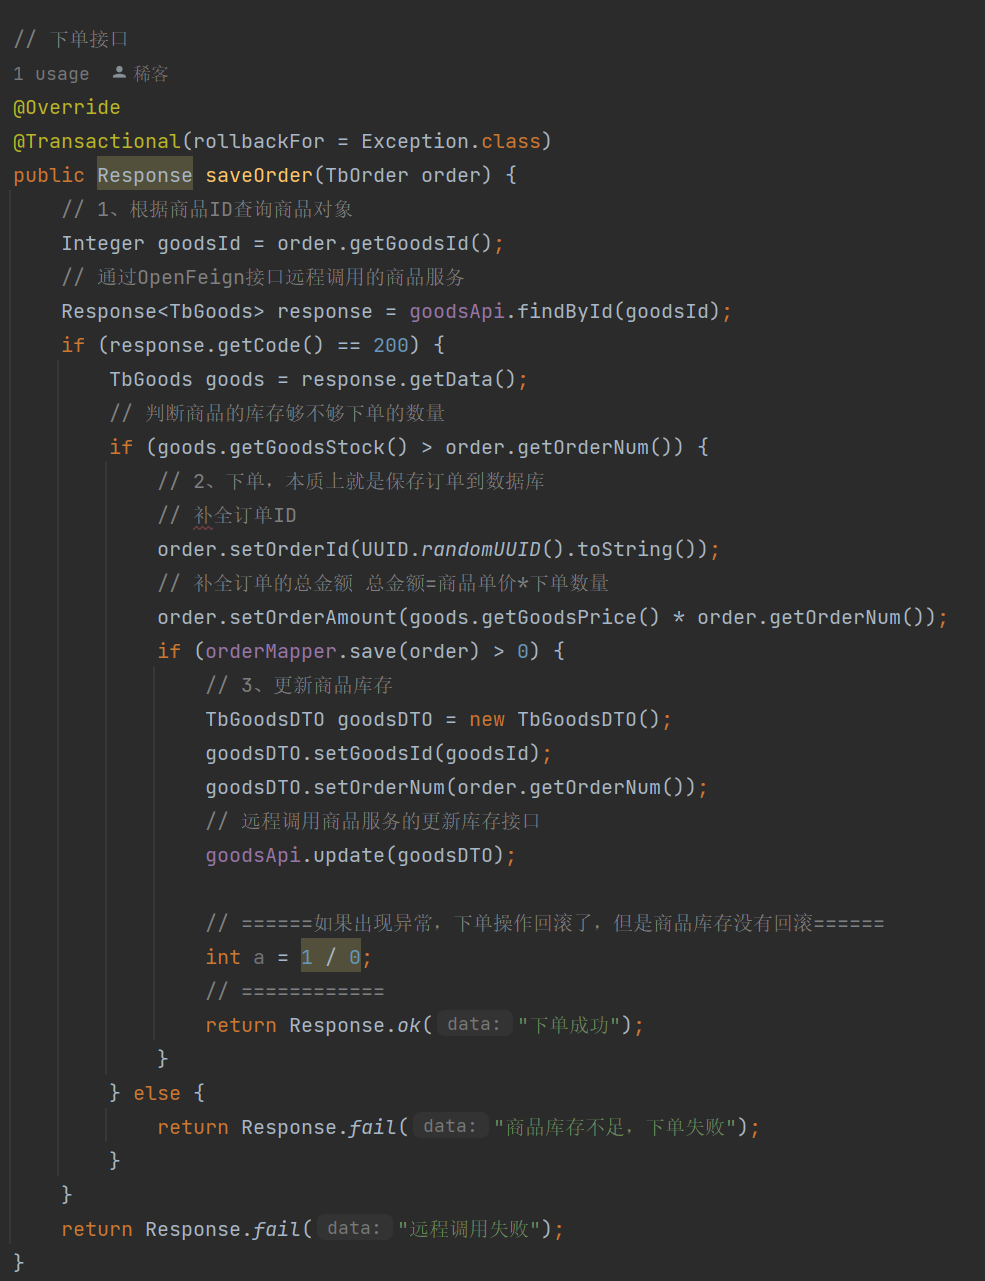
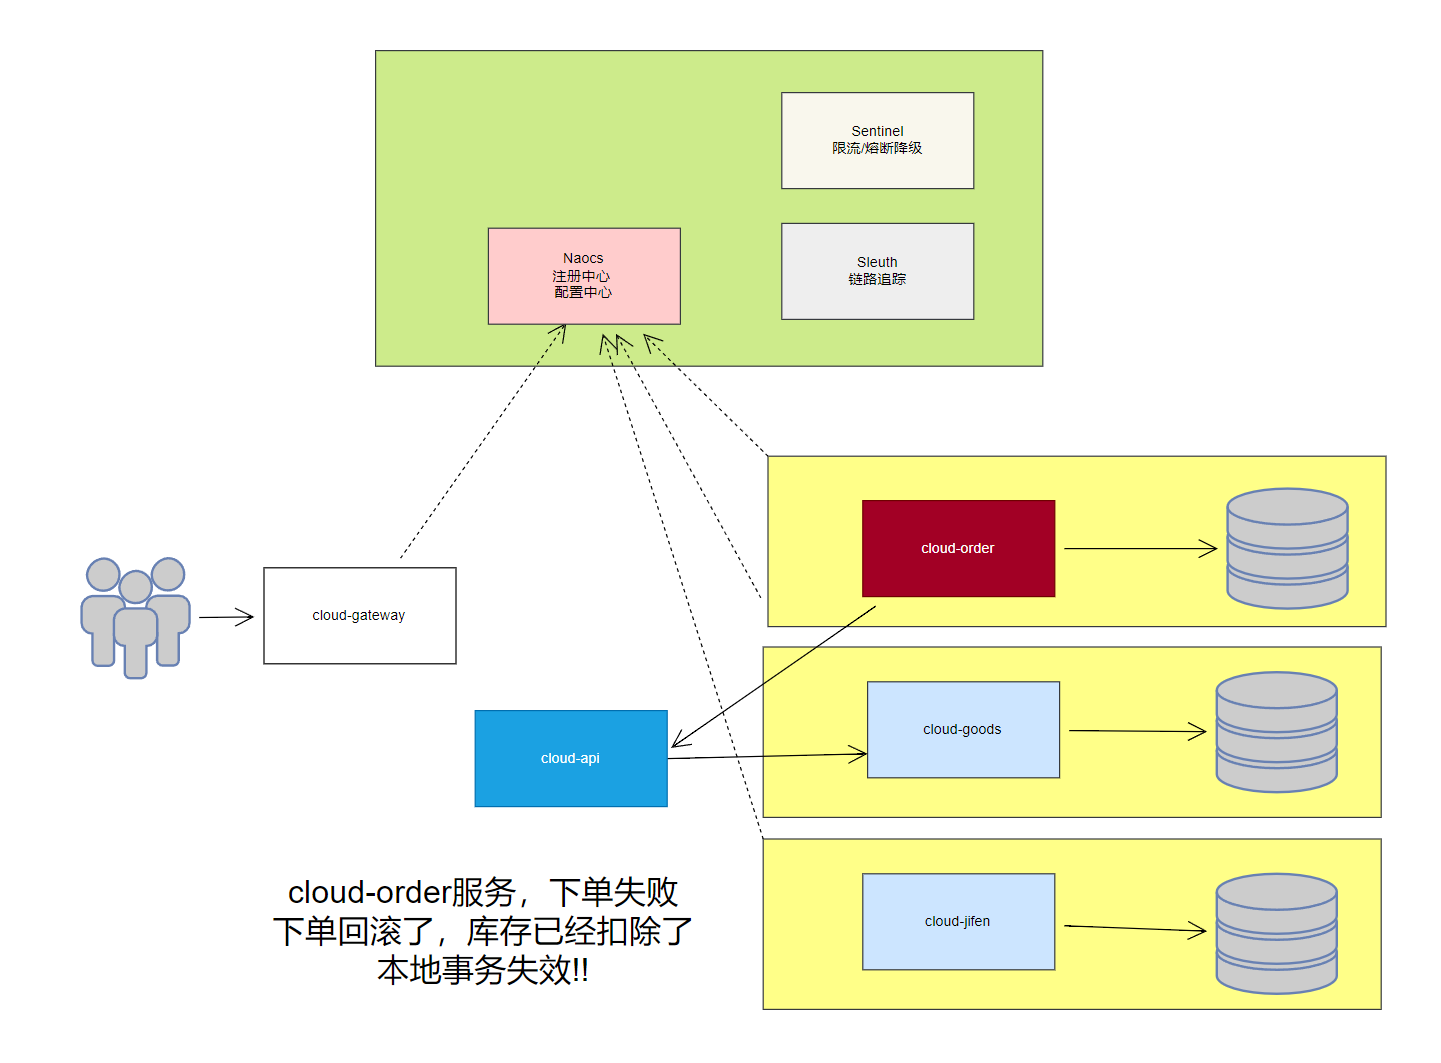
1.3:分布式事务问题复现
模拟下单需求
1:cloud-order服务:提交订单(tb_order insert)
2:cloud-goods服务:扣减库存(tb_goods update) api
entity
package org.qf.cloudentity.entity;

import lombok.Data;

import java.io.Serializable;

/**
 * 商品实体类
 */
@Data
public class TbGoods implements Serializable {

        private static final long serialVersionUID = -7165431574096870320L;
        /**
         * 商品ID
         */
        private Integer goodsId;
        /**
        * 商品库存数量
        */
        private Integer goodsStock;
        /**
        * 商品价格
        */
        private Double goodsPrice;
        /**
        * 商品名称
        */
        private String goodsName;
}
package org.qf.cloudentity.entity;

import lombok.Data;

import java.io.Serializable;

/**
 * 订单的实体类
 */
@Data
public class TbOrder implements Serializable {
    private static final long serialVersionUID = 6705789782242973361L;
    /**
     * 订单ID
     */
    private String orderId;
    /**
     *下单数量
     */
    private Integer orderNum;
    /**
     * 订单的总金额
     */
    private Double orderAmount;
    /**
     * 商品的ID
     */
    private Integer goodsId;
}
package org.qf.cloudentity.entity;

import lombok.Data;

/**
 * @author zed
 * @date 2022/9/21
 */
@Data
public class Response<T> {

    private Integer code;
    private String msg;
    private T data;

    public Response(Integer code, String msg, T data) {
        this.code = code;
        this.msg = msg;
        this.data = data;
    }

    // 响应成功的方法
    public static <T> Response<T> ok(Integer code, String msg, T data){
        return new Response<>(code, msg, data);
    }

    // 响应成功的方法
    public static <T> Response<T> ok(T data){
        return ok(200, "成功", data);
    }

    // 响应成功的方法
    public static <T> Response<T> ok(){
        return ok(null);
    }

    // 响应失败的方法
    public static <T> Response<T> fail(Integer code, String msg, T data){
        return new Response<>(code, msg, data);
    }

    // 响应失败的方法
    public static <T> Response<T> fail(T data){
        return fail(-1, "失败", data);
    }

    // 响应失败的方法
    public static <T> Response<T> fail(){
        return fail(null);
    }

}
CREATE TABLE tb_goods (
    goods_id INT(10) primary key not null auto_increment,
    goods_stock INT(10) ,
    goods_price decimal(18,4),
    goods_name VARCHAR(255)
);

CREATE TABLE tb_order (
    order_id VARCHAR(255) primary key not null,
    order_num INT(10),
    order_amount decimal(18,4),
    goods_id INT(10)
);
需要操作数据库的微服务[子项目]中添加mybatis和数据库相关的依赖内容如下:
<!-- mybatis-spring整合包 -->
<dependency>
    <groupId>org.mybatis.spring.boot</groupId>
    <artifactId>mybatis-spring-boot-starter</artifactId>
    <version>2.2.2</version>
</dependency>

<!-- mysql驱动包 -->
<dependency>
    <groupId>mysql</groupId>
    <artifactId>mysql-connector-java</artifactId>
</dependency>

<!-- druid 数据源 -->
<dependency>
    <groupId>com.alibaba</groupId>
    <artifactId>druid-spring-boot-starter</artifactId>
    <version>1.2.6</version>
</dependency>
子项目中添加数据库连接配置
spring:
  datasource:
    druid:
      driver-class-name: com.mysql.cj.jdbc.Driver
      username: root
      password: root
      url: jdbc:mysql://127.0.0.1:3306/cloud2208?useUnicode=true&characterEncoding=utf8&useSSL=false
      max-active: 40 #连接池配置
# mybatis配置
mybatis:
  configuration:
    map-underscore-to-camel-case: true
  mapper-locations: classpath:mapper/*.xml
# logger日志配置
logging:
  level:
    com.qf.orders.dao: debug # 这个DAO层包的路径改为自己的包路径
1.4 :分布式问题原因
| 分布式系统中有些场景下本地事务失效 |
|---|
 |
 |
二:Seata简介
Seata(Simple Extensible Autonomous Transaction Architecture) 是 阿里巴巴开源的分布式事务中间件,以高效并且对业务 0 侵入的方式,解决微服务场景下面临的分布式事务问题。
github地址:https://github.com/seata/seata
2.1:AT模式角色分析
Transaction Coordinator(TC): Maintain status of global and branch transactions, drive the global commit or rollback.

Transaction Manager(TM): Define the scope of global transaction: begin a global transaction, commit or rollback a global transaction.

Resource Manager(RM): Manage resources that branch transactions working on, talk to TC for registering branch transactions and reporting status of branch transactions, and drive the branch transaction commit or rollback.
Transaction Coordinator (TC):  事务协调器,维护全局事务的运行状态,负责协调并驱动全局事务的提交或回滚
Transaction Manager ™: 控制全局事务的边界,负责开启一个全局事务,并最终发起全局提交或全局回滚的决议
Resource Manager (RM): 控制分支事务,负责分支注册、状态汇报,并接收事务协调器的指令,驱动分支(本地)事务的提交和回滚
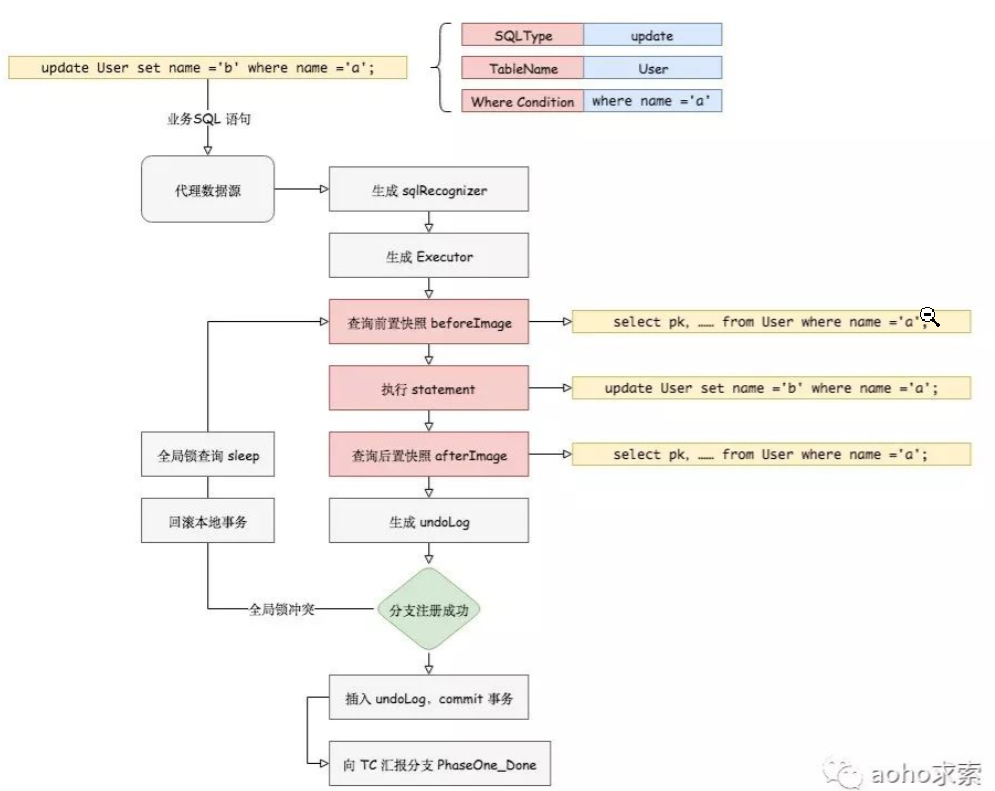
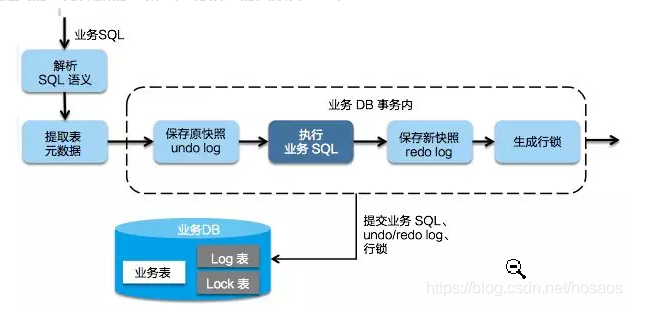
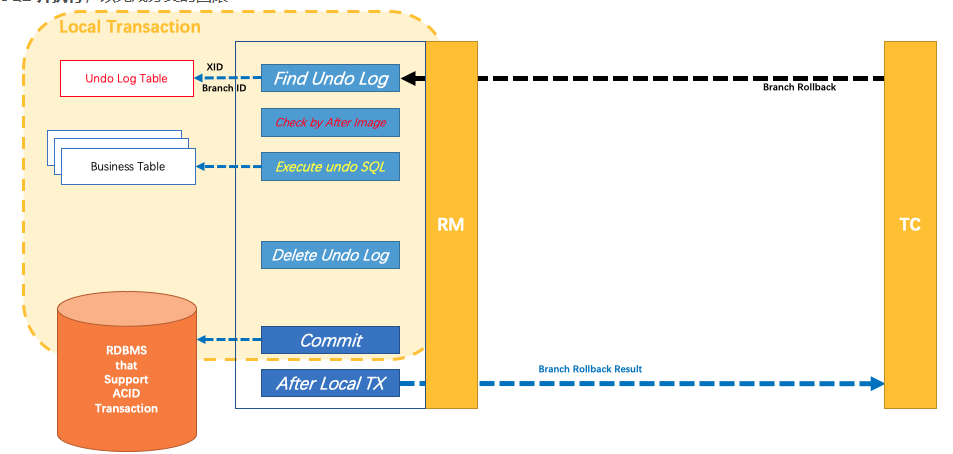
2.2:AT模式工作流程
第一阶段
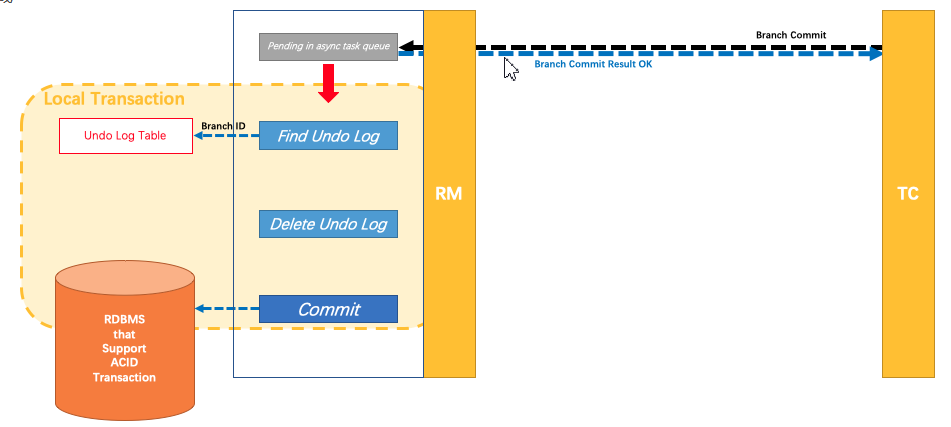
二阶段提交
如果决议是全局提交,此时分支事务此时已经完成提交,不需要同步协调处理(只需要异步清理回滚日志),Phase2 可以非常快速地完成
二阶段回滚
如果决议是全局回滚,RM 收到协调器发来的回滚请求,通过 XID 和 Branch ID 找到相应的回滚日志记录,通过回滚记录生成反向的更新 SQL 并执行,以完成分支的回滚
三:Seata应用
3.1:下载seata-server
下载地址:Tags · seata/seata · GitHub
3.2:配置Seata-server
第一步:配置seata-server数据源
D:\seata\seata-server-1.4.2\conf\file.conf
## transaction log store, only used in seata-server
store {
  ## store mode: file、db、redis
  mode = "db"
  ## rsa decryption public key
  publicKey = ""

  db {
    datasource = "druid"
    dbType = "mysql"
    driverClassName = "com.mysql.jdbc.Driver"
    url = "jdbc:mysql://127.0.0.1:3306/seata?rewriteBatchedStatements=true"
    user = "root"
    password = "root"
    minConn = 5
    maxConn = 100
    globalTable = "global_table"
    branchTable = "branch_table"
    lockTable = "lock_table"
    queryLimit = 100
    maxWait = 5000
  }
}
mode = "db"
url = "jdbc:mysql://127.0.0.1:3306/seata?rewriteBatchedStatements=true"
user = "root"
password = "root"
第二步:创建seata数据库
create database seata
第三步:创建3张表
表的脚本下载地址:https://github.com/seata/seata/tree/develop/script/server/db
-- the table to store GlobalSession data
CREATE TABLE IF NOT EXISTS `global_table`
(
    `xid`                       VARCHAR(128) NOT NULL,
    `transaction_id`            BIGINT,
    `status`                    TINYINT      NOT NULL,
    `application_id`            VARCHAR(32),
    `transaction_service_group` VARCHAR(32),
    `transaction_name`          VARCHAR(128),
    `timeout`                   INT,
    `begin_time`                BIGINT,
    `application_data`          VARCHAR(2000),
    `gmt_create`                DATETIME,
    `gmt_modified`              DATETIME,
    PRIMARY KEY (`xid`),
    KEY `idx_gmt_modified_status` (`gmt_modified`, `status`),
    KEY `idx_transaction_id` (`transaction_id`)
) ENGINE = InnoDB
  DEFAULT CHARSET = utf8;

-- the table to store BranchSession data
CREATE TABLE IF NOT EXISTS `branch_table`
(
    `branch_id`         BIGINT       NOT NULL,
    `xid`               VARCHAR(128) NOT NULL,
    `transaction_id`    BIGINT,
    `resource_group_id` VARCHAR(32),
    `resource_id`       VARCHAR(256),
    `branch_type`       VARCHAR(8),
    `status`            TINYINT,
    `client_id`         VARCHAR(64),
    `application_data`  VARCHAR(2000),
    `gmt_create`        DATETIME(6),
    `gmt_modified`      DATETIME(6),
    PRIMARY KEY (`branch_id`),
    KEY `idx_xid` (`xid`)
) ENGINE = InnoDB
  DEFAULT CHARSET = utf8;

-- the table to store lock data
CREATE TABLE IF NOT EXISTS `lock_table`
(
    `row_key`        VARCHAR(128) NOT NULL,
    `xid`            VARCHAR(96),
    `transaction_id` BIGINT,
    `branch_id`      BIGINT       NOT NULL,
    `resource_id`    VARCHAR(256),
    `table_name`     VARCHAR(32),
    `pk`             VARCHAR(36),
    `gmt_create`     DATETIME,
    `gmt_modified`   DATETIME,
    PRIMARY KEY (`row_key`),
    KEY `idx_branch_id` (`branch_id`)
) ENGINE = InnoDB
  DEFAULT CHARSET = utf8;
第四步:修改seata的注册中心\配置中心
D:\seata\seata-server-1.4.2\conf\registry.conf
# nacos 注册中心
registry {
type = "nacos"
nacos {
application = "seata-server"
# nacos 服务地址
serverAddr = "127.0.0.1:8848"
group = "SEATA_GROUP"
cluster = "default"
username = "nacos"
password = "nacos"
}
file {
name = "file.conf"
}
}
# nacos配置中心
config {
type = "nacos"
nacos {
# nacos 服务地址
serverAddr = "127.0.0.1:8848"
group = "SEATA_GROUP"
username = "nacos"
password = "nacos"
# dataId 配置中心配置文件名称
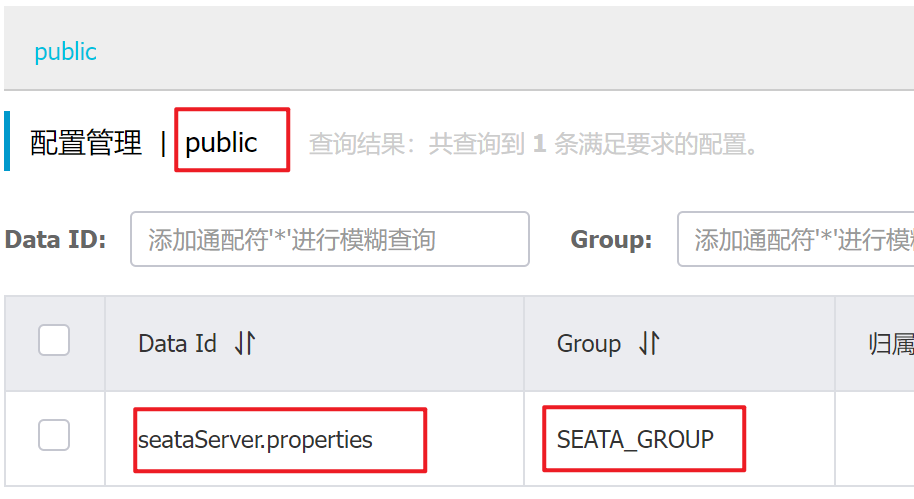
dataId = "seataServer.properties"
}
file {
name = "file.conf"
}
}
nacos地址: serverAddr = "127.0.0.1:8848"
第五步:Nacos配置中心管理seata配置
5.1:下载配置项
从上一步指定的配置项的 namespace/group/dataId 创建如下配置文件
#For details about configuration items, see https://seata.io/zh-cn/docs/user/configurations.html
#Transport configuration, for client and server
transport.type=TCP
transport.server=NIO
transport.heartbeat=true
transport.enableTmClientBatchSendRequest=false
transport.enableRmClientBatchSendRequest=true
transport.enableTcServerBatchSendResponse=false
transport.rpcRmRequestTimeout=30000
transport.rpcTmRequestTimeout=30000
transport.rpcTcRequestTimeout=30000
transport.threadFactory.bossThreadPrefix=NettyBoss
transport.threadFactory.workerThreadPrefix=NettyServerNIOWorker
transport.threadFactory.serverExecutorThreadPrefix=NettyServerBizHandler
transport.threadFactory.shareBossWorker=false
transport.threadFactory.clientSelectorThreadPrefix=NettyClientSelector
transport.threadFactory.clientSelectorThreadSize=1
transport.threadFactory.clientWorkerThreadPrefix=NettyClientWorkerThread
transport.threadFactory.bossThreadSize=1
transport.threadFactory.workerThreadSize=default
transport.shutdown.wait=3
transport.serialization=seata
transport.compressor=none

#Transaction routing rules configuration, only for the client
service.vgroupMapping.cloud-orders-seata-service-group=default
service.vgroupMapping.cloud-goods-seata-service-group=default
#If you use a registry, you can ignore it
service.default.grouplist=127.0.0.1:8091
service.enableDegrade=false
service.disableGlobalTransaction=false

#Transaction rule configuration, only for the client
client.rm.asyncCommitBufferLimit=10000
client.rm.lock.retryInterval=10
client.rm.lock.retryTimes=30
client.rm.lock.retryPolicyBranchRollbackOnConflict=true
client.rm.reportRetryCount=5
client.rm.tableMetaCheckEnable=true
client.rm.tableMetaCheckerInterval=60000
client.rm.sqlParserType=druid
client.rm.reportSuccessEnable=false
client.rm.sagaBranchRegisterEnable=false
client.rm.sagaJsonParser=fastjson
client.rm.tccActionInterceptorOrder=-2147482648
client.tm.commitRetryCount=5
client.tm.rollbackRetryCount=5
client.tm.defaultGlobalTransactionTimeout=60000
client.tm.degradeCheck=false
client.tm.degradeCheckAllowTimes=10
client.tm.degradeCheckPeriod=2000
client.tm.interceptorOrder=-2147482648
client.undo.dataValidation=true
client.undo.logSerialization=jackson
client.undo.onlyCareUpdateColumns=true
server.undo.logSaveDays=7
server.undo.logDeletePeriod=86400000
client.undo.logTable=undo_log
client.undo.compress.enable=true
client.undo.compress.type=zip
client.undo.compress.threshold=64k
#For TCC transaction mode
tcc.fence.logTableName=tcc_fence_log
tcc.fence.cleanPeriod=1h

#Log rule configuration, for client and server
log.exceptionRate=100

#Transaction storage configuration, only for the server. The file, DB, and redis configuration values are optional.
store.mode=db
store.lock.mode=file
store.session.mode=file
#Used for password encryption
store.publicKey=

#If `store.mode,store.lock.mode,store.session.mode` are not equal to `file`, you can remove the configuration block.
store.file.dir=file_store/data
store.file.maxBranchSessionSize=16384
store.file.maxGlobalSessionSize=512
store.file.fileWriteBufferCacheSize=16384
store.file.flushDiskMode=async
store.file.sessionReloadReadSize=100

#These configurations are required if the `store mode` is `db`. If `store.mode,store.lock.mode,store.session.mode` are not equal to `db`, you can remove the configuration block.
store.db.datasource=druid
store.db.dbType=mysql
store.db.driverClassName=com.mysql.jdbc.Driver
store.db.url=jdbc:mysql://127.0.0.1:3306/seata?useUnicode=true&rewriteBatchedStatements=true
store.db.user=root
store.db.password=root
store.db.minConn=5
store.db.maxConn=30
store.db.globalTable=global_table
store.db.branchTable=branch_table
store.db.distributedLockTable=distributed_lock
store.db.queryLimit=100
store.db.lockTable=lock_table
store.db.maxWait=5000

#These configurations are required if the `store mode` is `redis`. If `store.mode,store.lock.mode,store.session.mode` are not equal to `redis`, you can remove the configuration block.
store.redis.mode=single
store.redis.single.host=127.0.0.1
store.redis.single.port=6379
store.redis.sentinel.masterName=
store.redis.sentinel.sentinelHosts=
store.redis.maxConn=10
store.redis.minConn=1
store.redis.maxTotal=100
store.redis.database=0
store.redis.password=
store.redis.queryLimit=100

#Transaction rule configuration, only for the server
server.recovery.committingRetryPeriod=1000
server.recovery.asynCommittingRetryPeriod=1000
server.recovery.rollbackingRetryPeriod=1000
server.recovery.timeoutRetryPeriod=1000
server.maxCommitRetryTimeout=-1
server.maxRollbackRetryTimeout=-1
server.rollbackRetryTimeoutUnlockEnable=false
server.distributedLockExpireTime=10000
server.xaerNotaRetryTimeout=60000
server.session.branchAsyncQueueSize=5000
server.session.enableBranchAsyncRemove=false

#Metrics configuration, only for the server
metrics.enabled=false
metrics.registryType=compact
metrics.exporterList=prometheus
metrics.exporterPrometheusPort=9898
5.2:修改相关配置项
# 这两项配置跟客户端有关
service.vgroupMapping.cloud-orders-seata-service-group=default
service.vgroupMapping.cloud-goods-seata-service-group=default

store.mode=db

store.db.datasource=druid
store.db.dbType=mysql
store.db.driverClassName=com.mysql.jdbc.Driver
store.db.url=jdbc:mysql://127.0.0.1:3306/seata?useUnicode=true&rewriteBatchedStatements=true
store.db.user=root
store.db.password=root
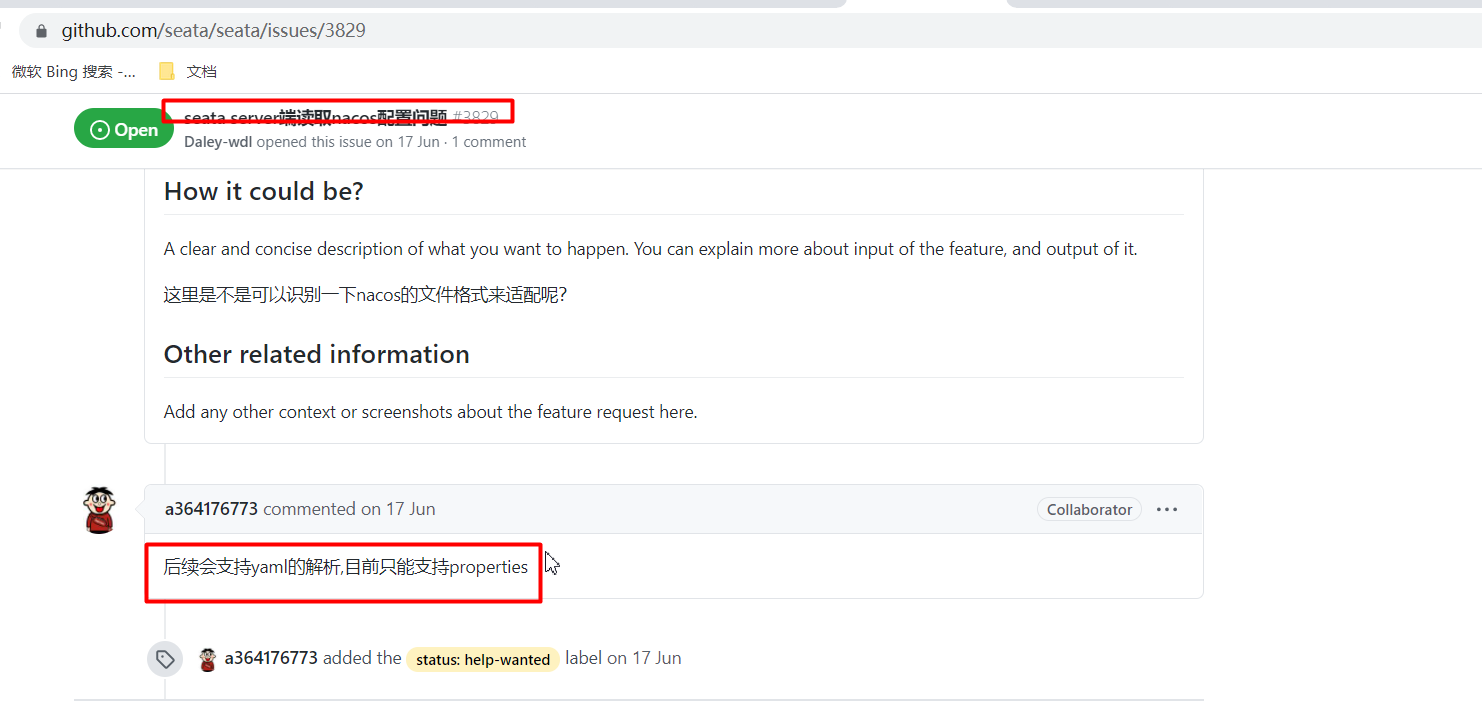
注意目前只支持properties,不支持yml
第六步:启动seata-server
双击启动

3.3:Seata客户端
一个调用链中的所有微服务都是seata的客户端,都必须走下面的步骤
第一步:创建undo_log表
下载地址:https://github.com/seata/seata/tree/develop/script/client/at/db
-- for AT mode you must to init this sql for you business database. the seata server not need it.

CREATE TABLE IF NOT EXISTS `undo_log`

(

    `branch_id`     BIGINT(20)   NOT NULL COMMENT 'branch transaction id',

    `xid`           VARCHAR(100) NOT NULL COMMENT 'global transaction id',

    `context`       VARCHAR(128) NOT NULL COMMENT 'undo_log context,such as serialization',

    `rollback_info` LONGBLOB     NOT NULL COMMENT 'rollback info',

    `log_status`    INT(11)      NOT NULL COMMENT '0:normal status,1:defense status',

    `log_created`   DATETIME(6)  NOT NULL COMMENT 'create datetime',

    `log_modified`  DATETIME(6)  NOT NULL COMMENT 'modify datetime',

    UNIQUE KEY `ux_undo_log` (`xid`, `branch_id`)

) ENGINE = InnoDB

  AUTO_INCREMENT = 1

  DEFAULT CHARSET = utf8 COMMENT ='AT transaction mode undo table';
第二步:pom依赖
<!-- seata -->
<dependency>
    <groupId>com.alibaba.cloud</groupId>
    <artifactId>spring-cloud-alibaba-seata</artifactId>
    <version>2.2.0.RELEASE</version>
    <exclusions>
        <exclusion>
            <groupId>io.seata</groupId>
            <artifactId>seata-spring-boot-starter</artifactId>
        </exclusion>
    </exclusions>
</dependency>
<dependency>
    <groupId>io.seata</groupId>
    <artifactId>seata-spring-boot-starter</artifactId>
    <version>1.4.2</version>
</dependency>
第三步:配置
seata:
  enabled: true
  enable-auto-data-source-proxy: true
  config:
    type: nacos
    nacos:
      server-addr: 127.0.0.1:8848
      group: SEATA_GROUP
      username: nacos
      password: nacos
      data-id: seataServer.properties
  registry:
    type: nacos
    nacos:
      application: seata-server
      server-addr: 127.0.0.1:8848
      group: SEATA_GROUP
      username: nacos
      password: nacos
第四步:@Globaltransational
| @Globaltransational 全局事务的注解 |
|---|
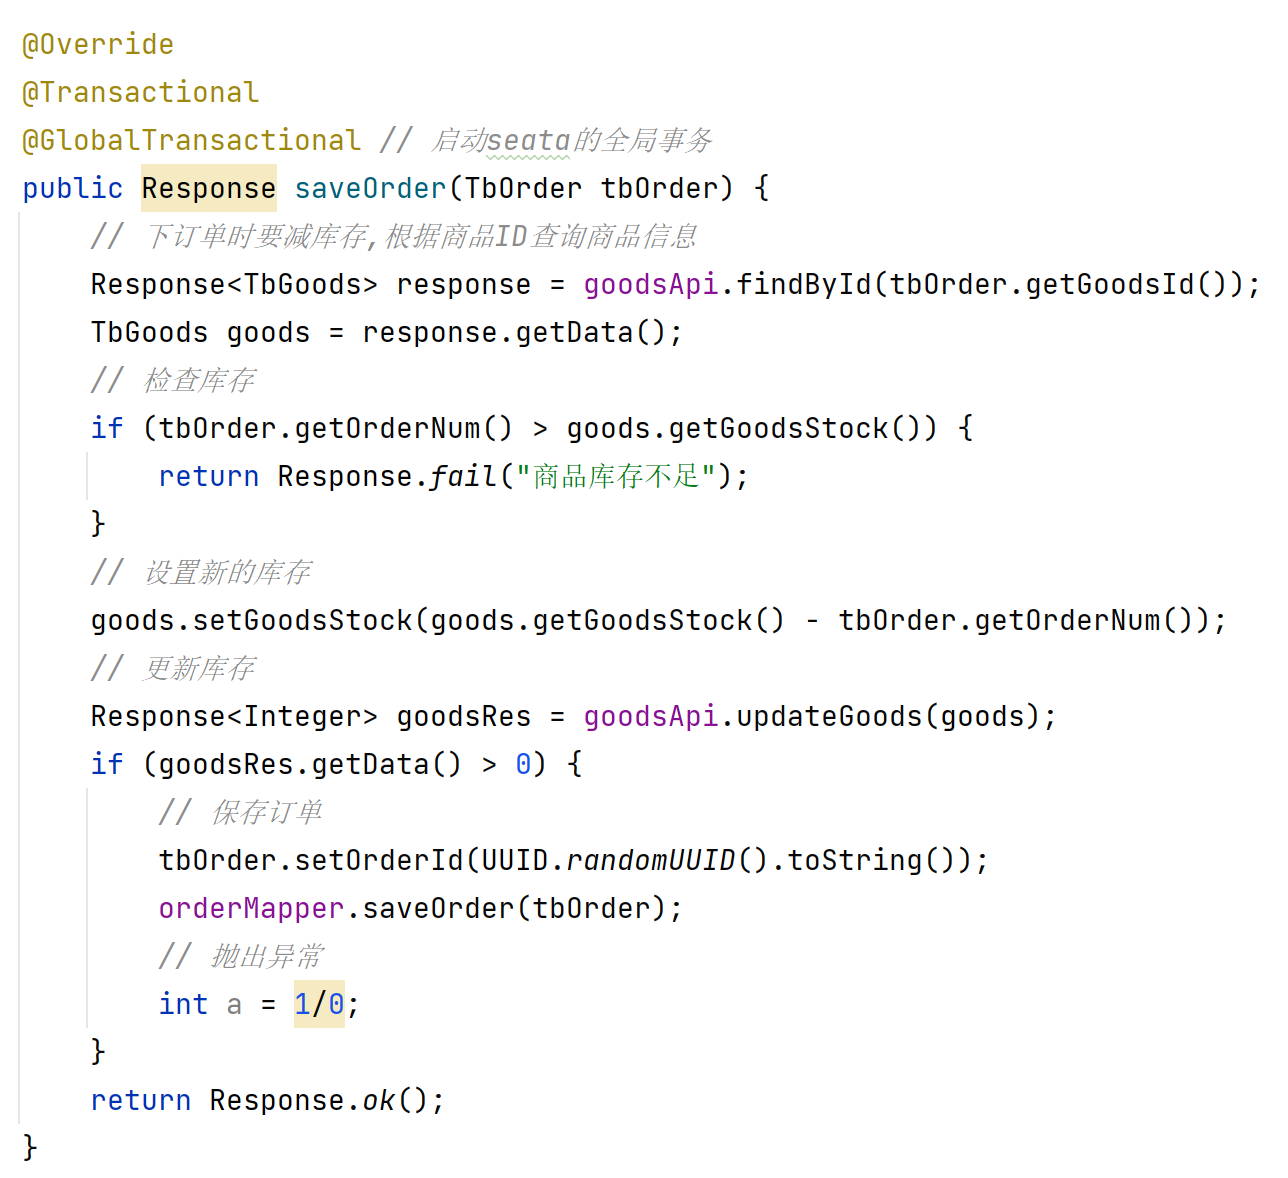 |
四:Seata全局事务并发怎么隔离
全局事务并行修改同一数据怎么隔离?
写隔离
- 一阶段本地事务提交前,需要确保先拿到 全局锁 。
- 拿不到 全局锁 ,不能提交本地事务。
读隔离
一个全局事务修改数据,另外一个全局读取数据怎么解决脏读
在数据库本地事务隔离级别 读已提交(Read Committed) 或以上的基础上,Seata(AT 模式)的默认全局隔离级别是 读未提交(Read Uncommitted) 。
如果应用在特定场景下,必需要求全局的 读已提交 ,目前 Seata 的方式是通过 SELECT FOR UPDATE 语句的代理。
面试
1:什么是分布式事务
分布式事务就是指事务的参与者、支持事务的服务器、资源服务器以及事务管理器分别位于不同的分布式系统的不同节点之上。以上是百度百科的解释,简单的说,就是一次大的操作由不同的小操作组成,这些小的操作分布在不同的服务器上,且属于不同的应用,分布式事务需要保证这些小操作要么全部成功,要么全部失败。本质上来说,分布式事务就是为了保证不同数据库的数据一致性。
2:怎么解决分布式事务?
AT、TCC、SAGA 和 XA 事务模式
3:seata分布式事务的工作流程/原理/机制
AT模式两阶段提交协议的演变:
- 一阶段:业务数据和回滚日志记录在同一个本地事务中提交,释放本地锁和连接资源。
- 二阶段:
- 提交异步化,非常快速地完成。
- 回滚通过一阶段的回滚日志进行反向补偿。
TCC编程模式:
所谓的TCC编程模式,也是两阶段提交的一个变种。TCC提供了一个编程框架,将整个业务逻辑分为三块:Try、Confirm和Cancel三个操作。以在线下单为例,Try阶段会去扣库存,Confirm阶段则是去更新订单状态,如果更新订单失败,则进入Cancel阶段,会去恢复库存。总之,TCC就是通过代码人为实现了两阶段提交,不同的业务场景所写的代码都不一样,复杂度也不一样,因此,这种模式并不能很好地被复用。
4:seata全局事务并发隔离的问题?
select查询是不加锁的,select…for update是会加锁的,而且是悲观锁,但是在不同查询条件时候加的锁的类型(行锁,表锁)是不同的。
select * from t_user where id = 1 for update;在where 后面查询条件是主键索引,唯一索引时候是行锁
查询条件是普通字段时候加的是表锁
代码仓库
本文代码库 查看【seata全局事务】提交记录